
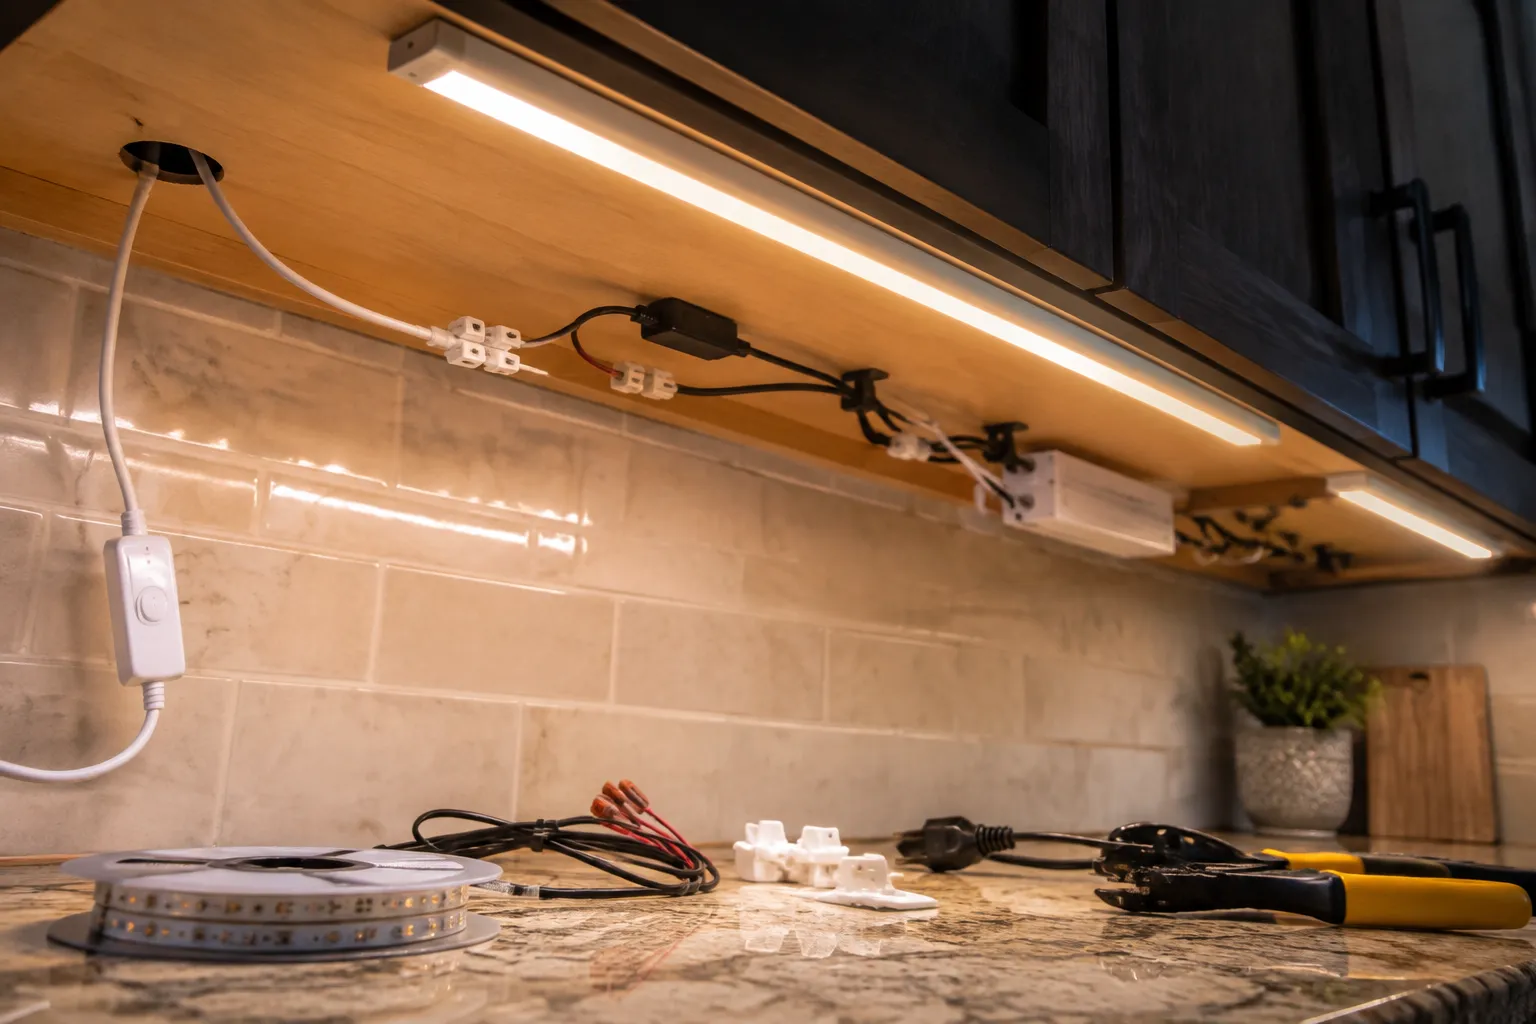
The wiring is the part of an under cabinet lighting job that sends most homeowners running back to the hardware store for a different fixture. Picking the light itself is easy. The LED tape or the slim puck looks fine, the color temperature feels right, and the price fits the budget. Then the package lands on the counter and the instructions reveal a tangle of leads, drivers, and connectors that do not match anything behind the existing switch. That mismatch is where projects stall.
Under cabinet lighting breaks down into three wiring families: plug-in, hardwired, and low voltage with a remote driver. Each one has a distinct set of tradeoffs around cutting holes, hiding transformers, and what happens when the LED strip eventually dies. Understanding those three paths before buying anything saves a person from owning a beautiful light bar that cannot be installed without a licensed electrician and a second trip to the store.
The plug-in route: no junction box required
Plug-in fixtures are the simplest option and the most overlooked by people who assume all under cabinet lights need to be wired into the wall. These units come with a cord that terminates in a standard two prong plug. The cord either hangs down to a receptacle on the backsplash, or the installer routes it through a small hole in the cabinet bottom to a plug hidden inside the cabinet itself.
The appeal is obvious. No electrical box, no wire nuts, no code inspection. A person with a drill and a steady hand can have the lights working in an afternoon. Many plug-in LED bars include an inline switch or a dimmer right on the cord, which eliminates the need to touch the wall switch at all.
The catch is the cord. Kitchens rarely have a receptacle conveniently placed above the counter, and a visible cord dangling down to a backsplash outlet looks unfinished. The better plug-in installations hide the cord by running it through the cabinet wall, but that requires drilling a clean hole and ensuring the plug can actually fit through it. Some fat plugs do not fit through a standard half inch hole, so the installer must enlarge the opening or buy a cord with a slimmer head.
Plug-in lights also occupy a precious receptacle. Kitchen counter circuits are already stretched thin with appliances, and code now demands that countertop outlets be on dedicated small appliance branches. Adding a light bar to that circuit is usually fine in practice, but it means losing a socket that might be needed for a toaster or a kettle.
Hardwired fixtures: the permanent solution
Hardwired under cabinet lights connect directly to the home's 120 volt branch circuit. The fixture has its own junction box, either integrated into the housing or mounted nearby, and the wires tie into the existing cabling with wire nuts or push in connectors. A wall switch controls them just like any other light in the house.
This is the route for anyone who wants a clean, permanent installation with no visible cords and no plug taking up a socket. It also allows the lights to be grouped on a single switch, often the same switch that controls the overhead fixture, so the whole kitchen lights up with one flip.
The cost is complexity. Hardwiring means cutting into drywall, fishing cable through the wall cavity, and installing a new box if one does not already exist above the cabinets. That is not a Saturday morning job for most people. It is a job for an electrician, which adds labor cost and scheduling time to the project.
There is also the matter of the box itself. Many hardwired LED fixtures are slim and sleek, but the junction box they require is not. The box has to be accessible after installation, which means it sits either on top of the cabinet, in the wall, or in the cabinet interior. On top of the cabinet works if the gap between the cabinet top and the ceiling is deep enough, but that space is often cramped and dark. Inside the cabinet means losing shelf depth. A person should measure that space before committing to hardwired fixtures.
Low voltage with a remote driver: the modern standard
Low voltage LED tape and bar lights operate on 12 or 24 volts, not the 120 volts that comes out of the wall. They need a driver, sometimes called a transformer or power supply, that steps the voltage down. That driver can be built into the plug or mounted remotely, hidden above the cabinets or in a nearby cabinet.
Remote driver setups are the current favorite for kitchen remodels, and for good reason. The driver sits out of sight, the LED tape is thin enough to hide behind the cabinet lip, and the low voltage wiring between driver and lights is thin and easy to route. There is no bulky junction box in view, and the dimming performance with a compatible driver is smoother than most hardwired fixtures.
The tradeoff is that the driver needs power from somewhere. A common installation has the driver plugged into a receptacle above the cabinet or inside an adjacent cabinet, with the low voltage cable snaking along the back edge of the cabinets to reach each light. The plug is hidden, but it is still a plug, which means the installation technically relies on an existing receptacle rather than a dedicated circuit.
For a cleaner look, the driver can be hardwired to the branch circuit. That combines the slim profile of LED tape with the permanence of a wall switch. The driver gets mounted in a junction box or a cabinet, the 120 volt side connects to the house wiring, and the low voltage side runs to the lights. This hybrid approach is what most professional kitchen installers use, because it hides everything and still allows a standard wall switch.
Low voltage tape also opens the door to features that hardwired 120 volt fixtures struggle to match. Color temperature tuning, dim to warm behavior, and app control all live on the driver side of the system. A person who wants the lights to shift from bright task lighting to a warm glow for evening entertaining has far more options with a remote driver than with a fixed hardwired bar.
The switch question: wall switch, inline switch, or smart control
How the lights turn on and off is a decision people make late in the process, and it often forces a change in the wiring plan. The simplest option is an inline switch on the cord or a switch built into the fixture. That works fine for a single light bar, but it becomes tedious with multiple fixtures under a long run of cabinets. Reaching across the counter to find a small switch on the underside of the cabinet gets old quickly.
A wall switch is the better answer for more than two fixtures. Hardwired systems wire straight into a wall switch. Low voltage systems can use a switch that controls the 120 volt side feeding the driver, so the driver stays on and the switch cuts power upstream. This is the cleanest setup, but it requires the switch to be installed and the circuit to be run, which again points toward an electrician.
Smart controls add a third path. Many LED drivers now accept a low voltage dimming signal, or they connect to a hub over Wi-Fi or Zigbee. That allows a phone app, a voice assistant, or a wireless wall switch to control the lights without any new wiring. The driver just needs to stay powered, which means it stays plugged in or hardwired, and the control happens at the signal level rather than the power level.
The smart route is genuinely convenient, but it carries a long term risk. If the manufacturer discontinues the app or the hub, the lights may become useless or stuck at one brightness. A plain wall switch will work in thirty years. A phone app from a company that folded last year will not. Anyone choosing smart controls should confirm the wireless protocol is a common standard, not a proprietary one, or keep the manual switch as a fallback.
Where the driver goes when there is no space
The remote driver solves the ugly transformer problem, but it creates a placement problem. Drivers generate heat, and they need air circulation. They cannot be sealed inside a tight cavity with no airflow. A driver that overheats will shut down, and repeated overheating shortens its life considerably.
The most common hiding spot is on top of the upper cabinets. That space is usually open to the ceiling and has enough airflow for a small driver. The catch is that the gap between the cabinet top and the ceiling varies. Some kitchens have a 12 inch gap, plenty of room. Others have a 2 inch gap, and a driver that is 1.5 inches thick fits but leaves almost no air movement. In that case, a person should mount the driver to the underside of the cabinet top or the wall, not lay it flat against a surface where heat has nowhere to go.
Another option is inside a base cabinet, mounted to the side wall near the top. That keeps the driver accessible for replacement, but it steals a few inches of interior space. Some drivers can also sit inside a shallow junction box installed in the wall behind the cabinets, though that requires cutting drywall and fishing wires, which erases much of the simplicity that made low voltage attractive in the first place.
Driver placement also affects maintenance. LED tape lasts a long time, but drivers fail more often than the lights themselves. A driver hidden above the cabinets is annoying to reach but accessible with a step stool. A driver buried inside a sealed box in the wall requires cutting the drywall open to replace it. That is a repair a homeowner will not do, and it turns a simple swap into a service call.
Connectors and the fragility of thin wire
Low voltage systems use small connectors that are easy to strip or break. The LED tape has solder pads at the cut points, and the wire connecting tape sections is often 20 or 22 gauge, thin enough to snap if pulled hard. A person installing these lights for the first time should handle the wiring like it is a strand of spaghetti, not a lamp cord.
The good news is that most kits now use push in connectors that do not require stripping or soldering. The tape slides into a plastic clip, the clip snaps shut, and the connection is made. These connectors work well when the tape is new and the pad is clean, but they can be finicky. A connector that does not click fully closed will cause a flicker or a section that stays dark.
Hardwired 120 volt fixtures avoid this fragility entirely. The connections are made with wire nuts or lever connectors inside a junction box, and the wire is thick enough to handle a bit of tugging. The tradeoff is that the fixture body is larger and the installation is more invasive. There is a reason professional installers often prefer hardwired bars for long runs: the wiring is sturdier and the connections are more forgiving of rough handling.
For anyone set on LED tape, the answer is to buy a system where the tape, the connectors, and the driver come from the same manufacturer. Mixing brands is a gamble. The pinouts on the connectors vary, the voltage requirements differ, and a 24 volt tape connected to a 12 volt driver will be dim or dead. Sticking with one brand removes a whole class of installation errors.
Dimmers and the compatibility trap
Dimming under cabinet lights seems straightforward until the lights start to flicker or hum. Most LED fixtures are dimmable, but they require a specific type of dimmer. A standard trailing edge dimmer that works fine with incandescent bulbs often causes LED fixtures to strobe at low levels or buzz at mid levels.
The safe approach is to check the fixture's datasheet for the recommended dimmer model. Many manufacturers list compatible dimmers, and that list is worth following. An incompatible dimmer does not damage the light, but it makes the dimming range useless, and the flicker is distracting enough that most people just end up running the lights at full brightness anyway.
Low voltage systems with a 0 to 10 volt dimming signal are the most reliable. That is a separate pair of control wires that run from the dimmer to the driver, and it works across virtually all LED drivers without compatibility issues. The catch is that 0 to 10 volt dimmers are a little harder to find in residential settings, and the control wiring has to be run alongside the power wiring.
Smart dimming sidesteps the compatibility problem entirely. The driver receives a digital signal over the network, and the dimming happens inside the driver itself. No separate dimmer switch is needed, which means no matching a dimmer to a fixture. The tradeoff is the reliance on the app and the network, which brings back the long term durability question.
Planning the run before buying anything
The single most useful step in the whole project happens before any fixture is ordered. A person should measure the total length of the cabinet run, note where the wall studs and any obstructions sit, and decide where the switch will live. That plan determines which wiring family is even feasible.
A long run of cabinets with no nearby receptacle and a desire for a wall switch points toward hardwired or a hardwired driver. A short run above a sink with a receptacle conveniently placed on the backsplash points toward plug-in. A person who wants app control and color tuning needs low voltage with a remote driver, no matter what the other constraints suggest.
The other factor is the wall switch. If the kitchen already has a switch that controls the under cabinet outlets, the plug-in route becomes much cleaner. Many homes built in the last few decades have a switch that turns one of the counter receptacles on and off, and that switch exists precisely so a homeowner can plug in lights and control them from the wall. Wiring becomes a matter of plugging in, not cutting drywall.
Older homes without that switched receptacle require a decision. Adding a switch means opening walls and fishing wire, which is the most expensive part of the entire project. Some people skip the switch and use plug-in lights with an inline switch, accepting that the control is local. Others bite the bullet and pay an electrician, because they know a row of under cabinet lights that cannot be turned off from the doorway will drive them crazy within a month.
The final cost difference between the wiring options is often larger than the difference between the fixtures themselves. A plug-in LED bar costs around sixty dollars and takes an hour to install. A hardwired installation with a wall switch costs three hundred dollars or more once an electrician is involved. A low voltage system with a remote driver sits in between, depending on how the driver gets power. Choosing the cheapest fixture and the most expensive wiring plan is a common mistake that reverses the budget entirely.
The right wiring choice comes down to what already exists in the kitchen and how much disruption a person is willing to tolerate. A clean, permanent installation with a wall switch is worth the cost for someone who lives in the house for the long term. A plug-in solution makes sense for a renter or for someone who wants the flexibility to change the light layout later. Nobody should buy the fixture first and figure out the wiring second. The wiring decides the fixture, not the other way around.
What tips the balance for most people is the driver placement and the switch. If the cabinet tops have room for a driver and the kitchen has a switched receptacle, low voltage tape is the best answer. If neither of those conditions holds, a hardwired bar with a wall switch is the more honest solution, even with the added cost. The plug-in route remains the fallback, a fine choice for small runs and temporary setups that keeps the project simple and reversible.
The last thing to remember is that the weak point of any LED system is not the light itself. It is the connection between the fixture and the power source. Loose wire nuts, a strained connector, or a driver crammed into a space with no airflow will kill a system long before the LED diodes fade. A careful installation that respects the wiring requirements will outlast a careless one that used better fixtures but sloppier connections. That is the part of the project nobody sees, and it is the part that determines whether the lights still work in a decade.