
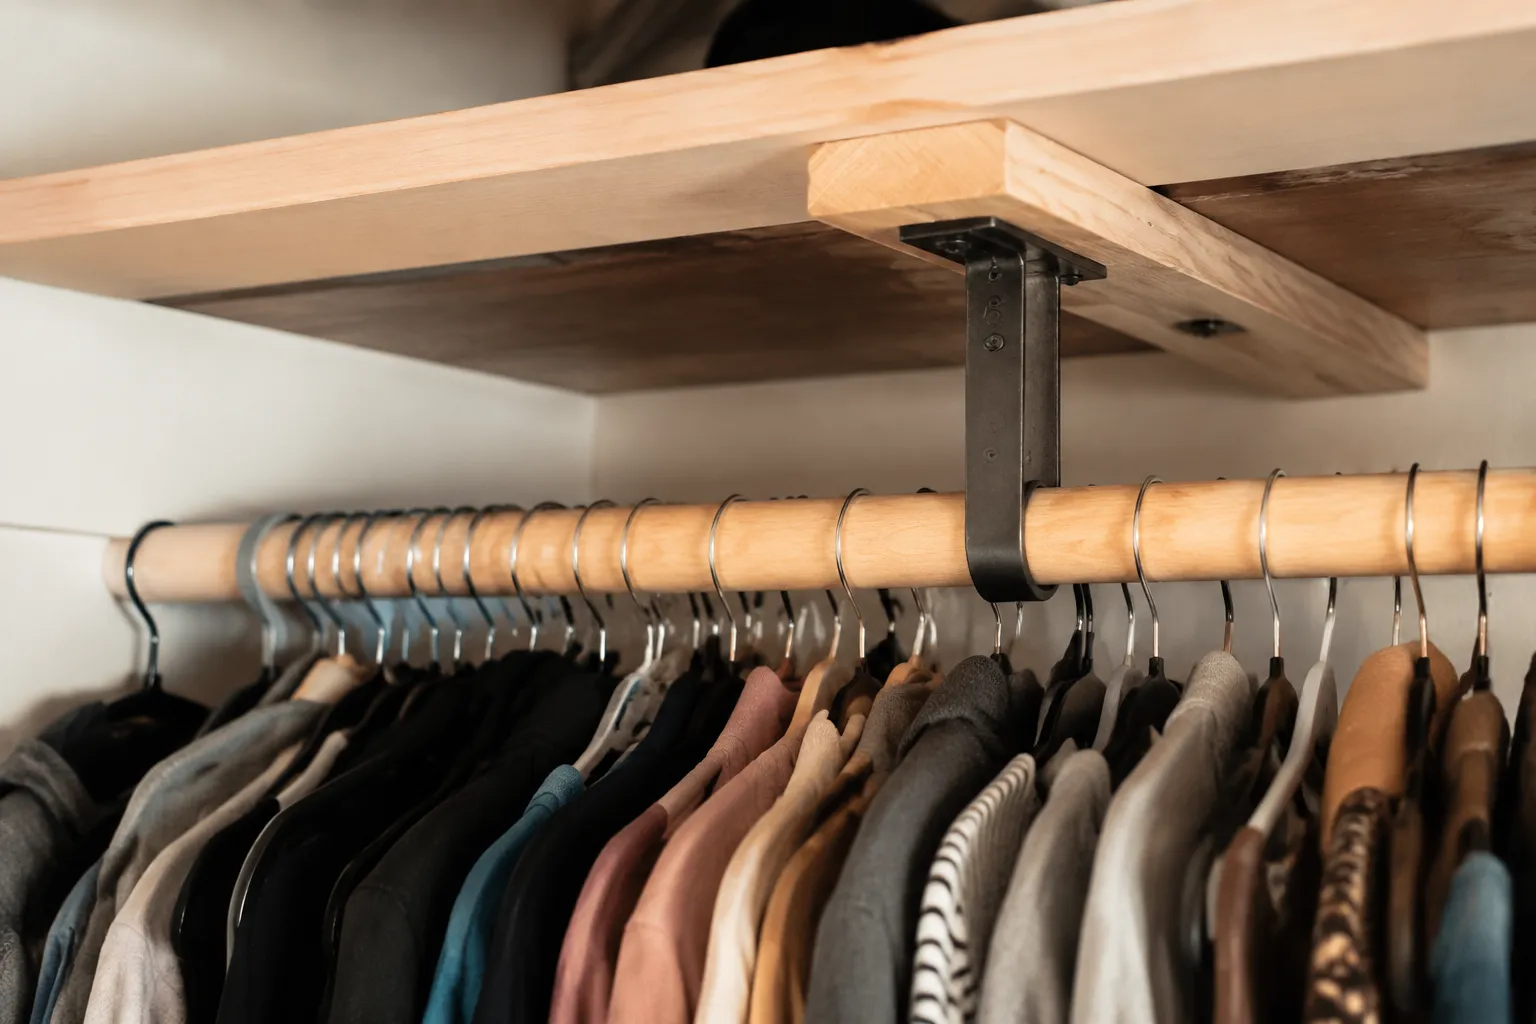
The closet rod that bends under the weight of heavy clothes is one of the most common household failures nobody warns anyone about. A person hangs a few winter coats, a stack of denim, maybe a leather jacket, and one day the rod looks like a gentle smile instead of a straight line. The fix seems simple enough, buy a sturdier rod, but the real problem is usually not the rod itself. It is the brackets holding it, the flange screws pulling out of drywall, or the fact that the entire system was designed for t-shirts and light blouses.
Most closet rods in standard homes are 1-inch diameter steel or aluminum tubes that rely on two end brackets. That setup works fine when the load is forty pounds spread evenly. Double it, or concentrate the weight in one spot, and the math changes. A 48-inch rod holding sixty pounds of coats will deflect noticeably in the middle. A 72-inch rod holding the same weight will look like a frown. The rod itself is rarely the weakest link. The weakest link is almost always the connection to the wall.
The first step in any reinforcement project is to stop blaming the rod and look at the brackets. A standard flange bracket attaches to the wall with two or four screws. Those screws bite into drywall, which is essentially compressed chalk with a paper face. Drywall holds maybe fifty pounds per properly anchored screw, and that is with a good anchor. Most closet installations use the cheap plastic anchors that come in the box, which are fine for a bath towel bar and inadequate for a winter wardrobe.
The Hidden Load of Everyday Clothes
People underestimate what a full closet actually weighs. A single heavy wool coat can weigh four to six pounds. A leather jacket adds three. A stack of five pairs of jeans is another five pounds. Fill a 48-inch rod with just ten heavy garments and the load passes fifty pounds easily. The rod will take it, the brackets usually will not, and the whole assembly starts to sag or pull loose over months of use.
The deflection starts small. A quarter inch of droop is easy to miss. But that slight angle shifts the load distribution, putting more stress on the middle and less on the ends. The rod keeps bending, the brackets keep straining, and eventually the drywall around the screws crumbles. That is when the entire rod comes down at 2 a.m. with a crash that sounds like a small tree falling indoors.
The fix has to address all three components: the rod, the brackets, and the wall anchor. Ignoring any one of them means the failure just moves to the next weakest point. A person can install a thick wooden dowel and watch it snap the brackets off the wall. Or upgrade the brackets and watch the drywall give way around the new screws. The system is only as strong as its worst connection.
Rod Diameter and Material Matter More Than Expected
Standard closet rods come in two common diameters: 1 inch and 1.25 inches. The thicker option is not just a little stronger. It is significantly stiffer because bending resistance scales with the fourth power of the diameter. A 1.25-inch rod is roughly two and a half times as stiff as a 1-inch rod of the same wall thickness. That difference is immediately noticeable when hanging a heavy load.
Material matters too. Steel is the default for good reason. Aluminum is lighter and easier to cut, but it flexes more under the same load. Solid wood dowels look warm and traditional but can warp or split over time, especially in humid climates. The best practical choice for heavy clothing is a steel rod with a wall thickness of at least 0.05 inches, which is heavier than the cheap versions but still manageable to install.
For truly heavy loads, consider a rod with a 1.5-inch diameter. These are less common and harder to find in hardware stores, but they are noticeably more rigid. The tradeoff is that standard hangers have hooks sized for smaller rods, and a 1.5-inch rod can make some hangers sit awkwardly. Most people do not need that level of reinforcement unless they are hanging industrial-grade workwear or multiple full-length fur coats.
The Center Support That Changes Everything
The single most effective upgrade for a sagging closet rod is a center support bracket. This is a small arm or flange that mounts to the back wall and catches the rod at its midpoint. For a 72-inch rod, a center support cuts the unsupported span in half, which reduces deflection by a factor of sixteen. That is not an exaggeration. Bending deflection scales with the cube of the span length, so halving the span makes the rod dramatically stiffer.
Center supports are cheap, usually under ten dollars, and take fifteen minutes to install. The tricky part is positioning. The support needs to sit exactly at the midpoint of the rod, and the rod needs to be level before the support is tightened. A slight misalignment creates a new stress point and a visible kink in the rod.
There is an alternative approach using a ceiling-mounted support rod that drops down and cradles the closet rod from above. This works well but requires access to the ceiling joists or solid blocking. In a typical closet, the ceiling is directly above the rod, so this is often easier than it sounds. A short length of chain or a metal strap can hold the rod up from the ceiling without taking up any floor space.
Wall Anchors That Actually Hold
The bracket is only as good as the anchor behind it. For any closet rod expected to hold more than fifty pounds, the standard plastic expansion anchor is not adequate. The most reliable option is a toggle bolt, which spreads the load across a wide area of the back side of the drywall. A 3/16-inch toggle bolt can hold over one hundred pounds in half-inch drywall, which is more than enough for even a heavily loaded closet.
Another strong option is a metal self-drilling drywall anchor, sometimes called a zinc anchor or a molly bolt. These bite into the drywall with sharp threads and distribute the load better than plastic. The downside is that they are permanent. Removing them leaves a large hole that requires patching. Toggle bolts have the same drawback, so the choice matters if the closet might be reconfigured later.
For a person who wants the strongest possible installation, the best approach is to locate the wall studs and screw directly into them. Studs are solid wood or metal framing behind the drywall, and a screw driven into a stud can hold hundreds of pounds. The problem is that the brackets rarely line up with stud locations. In a standard closet, the studs are spaced 16 inches on center, and the rod brackets are usually at the far ends of the wall, which may or may not fall on a stud.
When the stud does not line up, a piece of 3/4-inch plywood mounted across two studs provides a solid base. The plywood runs vertically behind the brackets, and the brackets screw into the plywood. This spreads the load across two studs and eliminates any reliance on drywall. It is not the prettiest solution, but it is the strongest one, and it can be hidden behind a row of hanging clothes.
When the Rod Itself Is the Weak Point
If the rod is visibly bending in the middle and the brackets are solid, the rod may simply be too thin. Many builder-grade closets use a 1-inch steel rod with a wall thickness of about 0.04 inches. This is adequate for light loads but will sag under heavy coats. Replacing the rod with a 1.25-inch version with a thicker wall is a direct upgrade.
For a custom solution, a length of 1-inch schedule 40 steel pipe works remarkably well. This is the same pipe used for gas lines and structural applications, and it is far stiffer than any closet rod sold in a big-box store. The pipe needs threaded ends or a simple flange adapter to sit in the brackets, but the strength is unmatched. A person with basic tools can cut and thread pipe to the exact length needed, and the result will outlast every other component in the closet.
The downside of steel pipe is weight and appearance. A 6-foot length of schedule 40 pipe weighs around thirty pounds and needs two people to maneuver into place. It is also raw steel, which shows rust unless painted or oiled. But for a heavy-duty workshop closet or a coat closet that holds every winter jacket for a family of five, the extra effort is justified.
The Corner Case of Double Rods and Full-Length Hanging
Some closets have both an upper rod and a lower rod for shirts and pants. The lower rod is usually closer to the wall and carries lighter loads, but it still needs its own support. Adding a center support to the lower rod is just as important as the upper rod, especially because the lower rod is often mounted with shorter brackets that have less leverage.
Full-length hanging, such as for dresses and long coats, puts the weight at the very bottom of the hanger, which increases the torque on the rod. The hanger hook twists slightly, and the rod experiences a bending moment that is not present with folded shirts on hangers. This is another reason why a center support matters for closets with long garments. The unsupported span should be no more than 36 inches for heavy items, and a center support on a 60-inch rod achieves that.
Signs That Reinforcement Is Already Too Late
A rod that has already sagged can sometimes be straightened and reinforced, but not always. If the rod is creased or kinked at the bend, the metal has yielded and will never spring back. Replacing it is the only option. If the brackets are loose and the screw holes in the drywall are enlarged, the wall material is damaged and will not hold new screws without patching.
A person who catches the problem early, at the first hint of a droop, can usually fix it with a center support and better anchors. A person who waits until the rod is visibly curved will need to replace the rod and patch the wall. The cost difference is roughly twenty dollars versus sixty dollars, and the time difference is an hour versus an afternoon.
The sagging rod is a slow failure. It does not snap suddenly like a broken chair leg. It bends a little more each season, and the clothes settle into the dip, which adds more weight to the center, which bends it further. This feedback loop is why a rod can look fine in March and be obviously warped by December.
A Practical Sequence for a Heavy Closet
The order of operations matters. A person should start by emptying the closet and measuring the rod span. Then assess the brackets: are they flush against the wall, are the screws tight, is there any gap between the flange and the drywall? Loose brackets indicate the anchors are failing, and tightening the screws will not help if the anchor is spinning in an oversized hole.
Next, decide on the anchor strategy. If the brackets line up with studs, drive long screws directly into the studs. If not, install toggle bolts. Then add a center support bracket, making sure the rod sits level before tightening the support. Finally, test the system with the heaviest items: hang all the coats on one side and check for any visible deflection.
The whole process takes about two hours with basic tools: a drill, a level, a stud finder, and a screwdriver. The parts cost between fifteen and forty dollars depending on the rod replacement decision. That is a small price for the peace of mind that comes from knowing the closet will not collapse at midnight.
The heavier the clothes, the more the rod system reveals its weaknesses. A single center support and a set of toggle bolts turn a failing closet into a reliable one. The materials are cheap, the work is straightforward, and the result is a rod that does not move when a person yanks a heavy coat off a hanger. That solid feel, the absence of any flex or creak, is the real measure of success. A reinforced closet rod should feel like part of the building, not like a temporary fixture waiting to give out.