
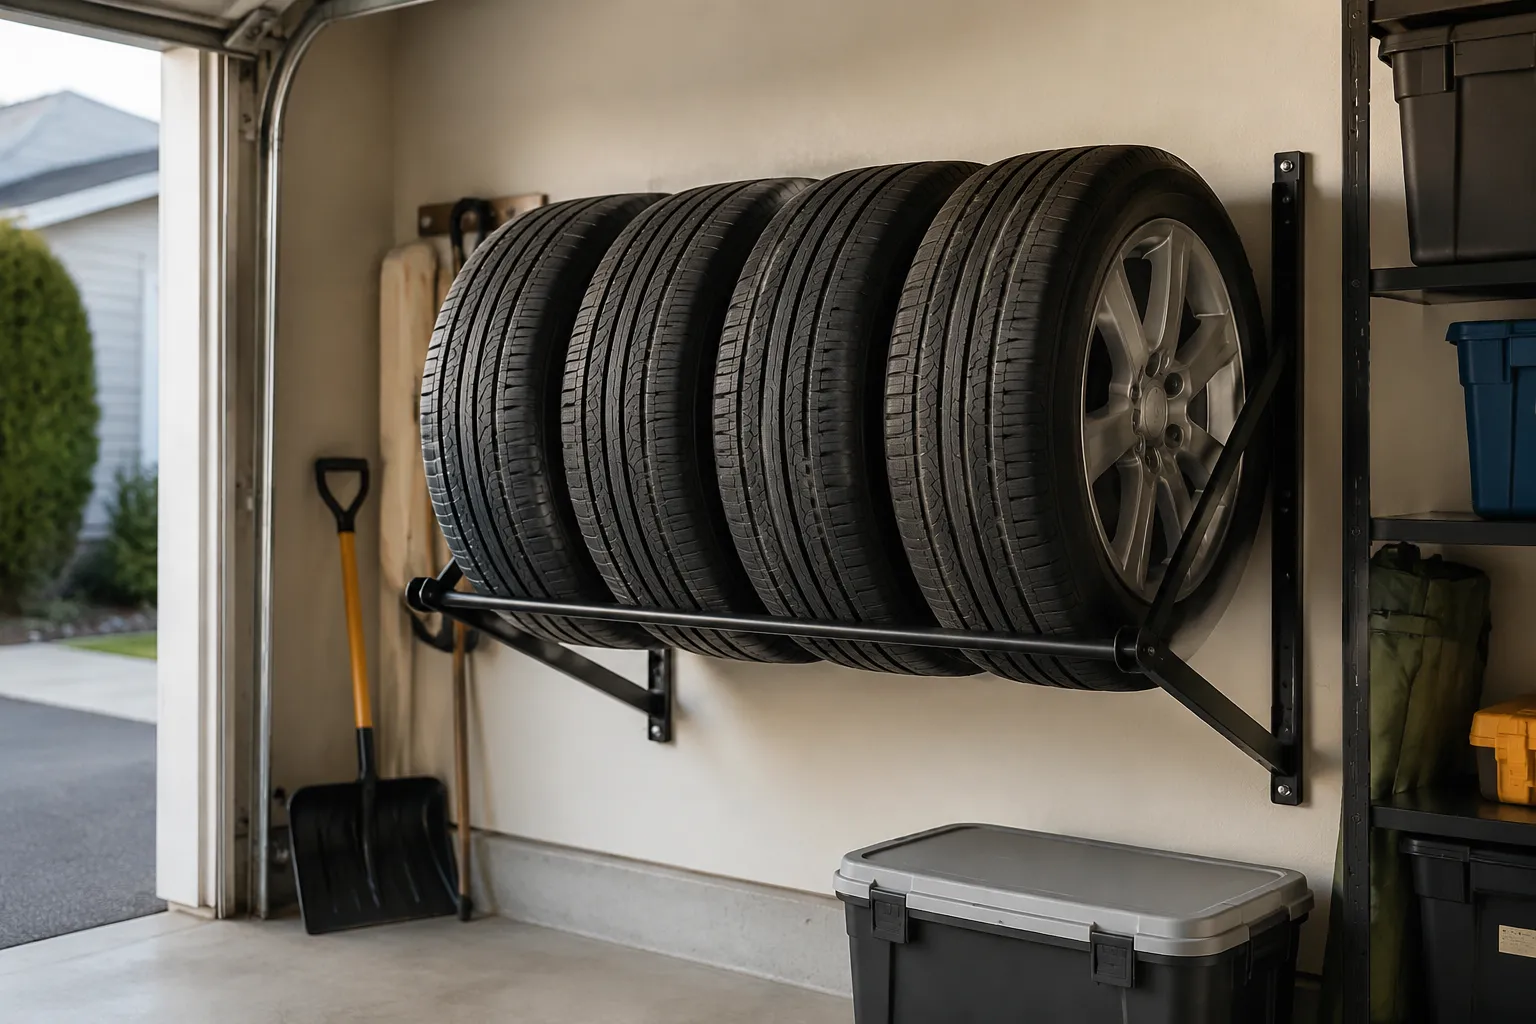
The garage wall is the most underused real estate in most American homes, and a set of wheels and tires is the perfect tenant. Seasonal tire storage is a problem every driver with a dedicated winter set eventually faces, and the default solutions are all bad. Stacking them on the floor eats space and invites moisture. Leaning them against a wall warps the sidewalls. Paying a shop to store them costs money for something a person can do at home in an afternoon. The wall mount is the right answer, but the hardware aisle is full of traps. Most of what gets sold for this job is either overengineered junk or too flimsy to trust with something that costs as much as a good set of tires.
The core problem is that tires are heavy, awkward, and unforgiving. A typical mounted wheel and tire assembly for a sedan weighs between 40 and 60 pounds. A truck or SUV setup can push 80 pounds or more. That weight has to sit on something that will not gouge the finish, will not flex over a decade of seasonal change, and will not let the assembly roll off and land on a foot. The good news is that the wall mount itself is a solved problem. The bad news is that most people buy the wrong one.
The Three Ways to Hang a Wheel
Every wall mount on the market falls into one of three categories. The first is the horizontal bar, a pair of steel rails that the tire sits on like a shelf. The tire rests flat against the wall, its face perpendicular to the floor. This is the most common design and the one most people picture when they think of tire storage. The second is the vertical hanger, a single arm that pokes through the center bore of the wheel so the assembly hangs like a picture frame. The third is the strap or hook system, which wraps around the tire itself and suspends it from a single point.
The horizontal bar is the right choice for almost everyone. It spreads the weight across the full width of the tread, puts no stress on the wheel itself, and makes it trivial to slide a tire on and off. The vertical hanger is a better space saver, since it tucks the tire closer to the wall, but it requires that the wheel have an open center bore and it puts all the weight on the hub area. The strap system is the cheapest and the most dangerous, since a single strap failure sends a 50-pound assembly straight down.
What a Cheap Mount Gets Wrong
The hardware store special, the one that comes in a box with a glossy photo of a pristine garage, is usually a pair of stamped steel brackets with a plastic coating. The plastic is the first thing to fail. It chips, it peels, and it leaves bare metal against the wheel face. Within two seasons, the bracket has left a rust stain on a set of wheels that cost more than the bracket did. The steel itself is often no better. Twenty-gauge metal flexes under a full tire, and the flexing creates a slow, grinding wear point where the tire meets the bracket.
The mounting hardware is where these cheap units really cut corners. A bracket rated for 50 pounds needs a lag bolt screwed into a stud, not a drywall anchor. The instructions on most cheap mounts show a drywall anchor as the primary installation method, which is a lie. Drywall anchors hold maybe 15 pounds of dead weight. A tire that gets bumped while a person is moving a lawnmower past it will pull that anchor straight out of the wall. The mount does not fail because the bracket broke. It fails because the installation was never going to hold.
The Stud Is Everything
Before buying any mount, a person needs to find the studs in the garage wall. A stud finder is the tool for this, and the cheap magnetic ones work fine. The magnet locates the drywall screws, which mark the stud centers. Mark the studs with a pencil, then hold the mount up and check whether the bracket holes line up with the marks. If they do not, the right move is to mount a piece of 3/4-inch plywood across the studs and bolt the tire rack to the plywood. That spreads the load across multiple studs and gives total freedom on bracket placement.
The plywood backing plate is the single most reliable upgrade a person can make to any wall mount. A 2-by-4-foot sheet of plywood, painted to match the wall, screwed into three or four studs with 3-inch lag bolts, will hold a set of truck tires without complaint. The brackets then attach to the plywood with short bolts and washers. This setup costs about 20 dollars in materials and turns a marginal product into something that will outlast the tires it holds. Anyone who has ever watched a tire rack pull out of drywall will never skip the plywood again.
Mounting Height and the Back Problem
The most common installation mistake after the drywall anchor is mounting the rack too low. A tire at floor level is not storage, it is a stack with extra steps. The whole point of a wall mount is to get the tires off the floor and out of the way. The bottom of the lowest tire should sit at least 18 inches off the ground. That clears room for a broom, a trash can, or a workbench underneath. It also makes the tires harder for rodents to climb, which matters in any garage that has ever seen a mouse.
The upper limit is where the back gives out. Lifting a 50-pound tire above shoulder height is a strain that most people underestimate. The safe range is between waist and chest height, where a person can hug the tire and slide it onto the bracket without a full overhead press. A two-row rack should put the bottom row at about knee height and the top row at chest height. Anything higher trades a back injury for a clean wall, and that is a bad trade.
The Tire Goes On Face-Down, Not Tread-Down
There is a right way and a wrong way to orient the tire on the bracket, and most people get it wrong the first time. The tire should rest with the wheel face toward the wall and the tread facing out into the room. This puts the flat face of the wheel against the flat surface of the bracket, which is the stable configuration. The sidewall then shows to the room, which is the surface that can absorb a bump without damage. The tread, which is the heaviest and roundest part, faces outward and is easy to grab.
The wrong orientation, tread against the wall, makes the tire want to roll off the bracket. The curved tread sits on a flat rail, which means only a small patch of rubber touches the steel. Any bump shifts the tire, and the next bump rolls it off. A tire mounted tread-in is a tire waiting to fall. The face-in method also protects the wheel face from garage dust and from the inevitable scrape of a passing ladder. The wheel face is the most expensive visible surface on the assembly, so burying it against the wall is a feature.
Weight Ratings Are a Marketing Number
The weight rating printed on the box of most tire mounts is the weight the bracket can hold in a perfect test, with the load perfectly centered and the bracket bolted to a solid steel beam. Real life is not that test. A tire gets bumped, a person leans on it while reaching for something on the shelf above, a box gets stacked against it. The real safe load is about half the printed rating. A mount rated for 100 pounds will handle a 50-pound tire with a comfortable margin. A mount rated for 50 pounds will handle a 40-pound tire with no margin at all.
This is why the heavy-duty mounts with the thicker steel and the higher price tags are worth the money. The difference between a 16-gauge and a 14-gauge steel bracket is not a marketing gimmick. It is the difference between a bracket that flexes under load and one that does not. Flex is what creates wear points, loosens bolts, and eventually causes a failure. The extra 15 dollars for the heavier bracket is cheap insurance for a set of wheels that cost 800 dollars.
The Plywood Solution in Practice
A person with basic tools can build a better tire rack than anything sold at retail for about 30 dollars in materials. The build starts with a sheet of 3/4-inch plywood, cut to fit the space. A 4-foot-wide section of wall holds three tires comfortably, which covers most sedans and crossovers. The plywood gets painted or sealed to keep moisture out, then screwed into the studs with 3-inch lag bolts. The horizontal brackets mount to the plywood with 1/4-inch bolts, washers, and lock nuts.
The advantage of this approach is that the brackets themselves become replaceable. A person can start with cheap brackets and upgrade later without re-drilling the wall. The plywood becomes the permanent fixture, and the brackets are just accessories. It also allows spacing the brackets to fit the exact tire width. A 225-millimeter tire needs different bracket spacing than a 275-millimeter tire, and the plywood approach makes that adjustment a 10-minute job with a drill and a wrench.
The Four-Tire Minimum and the Fifth Wheel
Most seasonal storage involves four tires, since a full set is what gets swapped twice a year. A rack that holds four tires needs either two rows of two or one row of four. The one-row option is better. It keeps all four tires at the same height, which makes the spring swap a single motion instead of a two-level dance. A 4-foot wall section with four brackets spaced evenly will hold a full set with room to spare. The brackets should be spaced about 24 inches apart, which accommodates tires from 205 to 285 millimeters in width.
The fifth wheel is the spare, and it is the one that always gets forgotten. A spare tire and wheel assembly is usually the same weight as the road tires, and it needs a home. The smart move is to add a single bracket at the end of the row, set slightly higher, and designate it as the spare's spot. That keeps the spare out of the trunk and off the floor. It also makes it obvious when the spare is missing, which is a reminder a person appreciates on the morning of a flat tire.
Seasonal Rotation and the Label Trick
The wall mount solves the storage problem, but it does not solve the organization problem. Every spring, a person stands in the garage trying to remember which tire goes on which corner. The answer is a roll of painter's tape and a permanent marker. When the tires come off the car, a strip of tape on the inside of each wheel face gets labeled with the position, like "LF" for left front. When the tires go back on in the fall, the labels tell the story.
The label also solves the question of which tires go on the top row. Heavier tires go on the bottom row, since that lowers the center of gravity of the whole rack. The two front tires, which are usually the heavier ones on a front-wheel-drive car, go on the bottom. The rear tires go on top. This is not just about balance. It is about the daily strain of lifting. The heaviest tires are the hardest to lift, and the bottom row is the easiest to reach.
Temperature and the Concrete Floor Problem
Wall mounts get tires off the concrete, and that matters more than most people realize. Concrete floors are never as dry as they look. They wick moisture from the ground below, and a tire sitting on concrete for three months absorbs that moisture through the rubber. The result is a tire that is harder, drier, and more prone to cracking. The rubber compounds in modern tires are not designed for long-term contact with damp concrete. A wall mount lifts the tire into the air, where air can circulate around the whole surface.
The other floor problem is the temperature difference. Concrete stays colder than the air in the garage, especially in a slab-on-grade foundation. A tire sitting on that cold surface develops a temperature gradient from bottom to top, which promotes uneven wear patterns in the rubber. It is a subtle effect, but over a decade of seasonal storage, it shows. The wall mount eliminates the gradient entirely, since the tire hangs in the same air temperature on all sides.
The Rental Garage and the No-Drill Option
Not everyone owns the wall they are drilling into. Renters face a different problem: how to store tires without leaving holes in the drywall at move-out. The answer is a freestanding rack that leans against the wall, angled back slightly so the weight of the tires presses it into the wall. These units take up more floor space than a wall mount, but they require no drilling and no patching. The best ones use a wide base and a padded top rail, and they hold four tires without complaint.
The freestanding option is also the right call for a garage with metal studs. Metal studs are hollow and weak, and they do not hold lag bolts the way wood studs do. A person can use toggle bolts on metal studs, but the holding power is still questionable for a 50-pound load. The freestanding rack sidesteps the whole problem. It also travels well. A person moving between apartments can take the rack apart, move it in a car, and reassemble it in the next garage in 15 minutes.
Checking the Mount Twice a Year
The wall mount is not a set-and-forget installation. Twice a year, at the same time the tires get swapped, the mount deserves a 60-second inspection. The check is simple: grab each loaded bracket and wiggle it. Any movement at the wall means the lag bolts have loosened, which happens over time as the wood dries and the weight cycles on and off. A quarter-turn with a socket wrench tightens them back up. The plastic coating on the brackets also needs a look. A chip or crack in the coating is the first sign of future rust, and a wrap of electrical tape or a dab of rubberized paint stops it from spreading.
The inspection is also the time to check the tires themselves. A tire that has developed a flat spot, a crack in the sidewall, or a bulging tread is a tire that needs attention before it goes back on the car. The wall mount puts the tire at eye level, which makes this inspection a natural part of the swap. A tire stored on the floor gets ignored. A tire hanging on the wall gets looked at. That alone justifies the mount.