
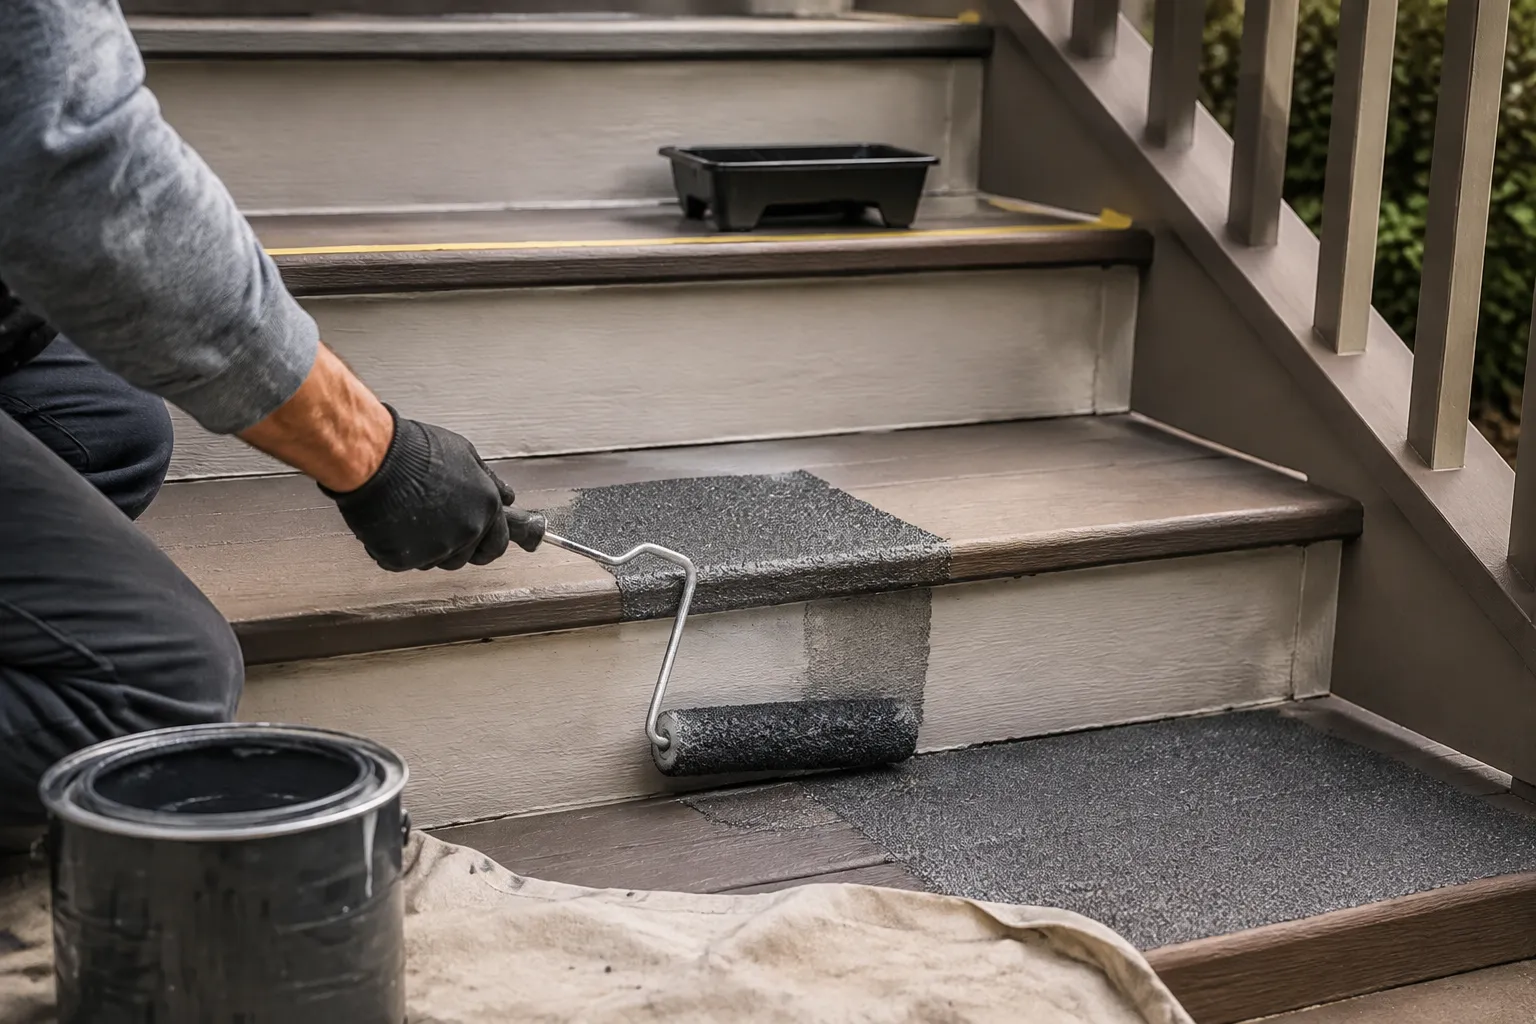
The gloss on a set of stairs wears away in a map of the people who use them. The center of each tread goes dull first, then the edges near the handrail, then the nose where every foot pushes off. A stair that was once slick with fresh paint becomes a surface that grabs, then a surface that only looks fine. Paint manufacturers sell this as a feature. It is not a feature. It is the difference between a step that stops a foot and a step that lets it slide.
Stair treads take more abuse per square foot than almost any other painted surface in a house. A floor gets walked on. A stair gets walked on with the full weight of the body coming down at an angle, often in a hurry, often carrying something. The paint needs to do two jobs at once: hold up to that pounding and provide traction when the surface is damp, dusty, or worn smooth by slippers. Ordinary wall paint fails at both. Porch and floor paint does better but still treats traction as an afterthought. The real solution lives in additives, texture, and a willingness to give up the idea that a stair should look like a flat, glossy plane.
The first question a person should ask is not what color to paint the treads. It is what the surface will feel like underfoot on a bad day. A dry stair with fresh paint is easy. The same stair after a rainstorm, with wet shoes, or after a year of bare feet wearing the finish smooth is a different animal. Grip additive solves that. The second question is whether the paint itself can survive the edge of the step, because the nose of a tread takes a beating that flat sections never see.
Why the Nose of the Stair Fails First
The front edge of a tread is where the finish dies. Every step down puts the full body weight on a strip of paint maybe an inch wide. Every step up drags the ball of the foot across that same strip. Add in the occasional scuff from a shoe heel catching the edge, and the constant flexing of the wood or metal underneath, and the result is predictable: cracking, chipping, and bare patches that appear within a season or two.
Paint alone does not fix this. A hard, brittle finish like a standard porch enamel will chip at the nose no matter how carefully it is applied. The better approach is to treat the nose as a separate problem. A coat of elastomeric or rubberized paint at the edge can absorb the flex. Or, for a more permanent fix, a metal or rubber stair nosing cap covers the edge entirely and puts the paint out of work. Many older houses have these already under layers of old finish, hidden behind paint buildup and years of neglect.
The nose is also where grip matters most. A foot that slips at the back of a tread is annoying. A foot that slips at the front of a tread is a fall. The texture needs to be concentrated there, or at least present there, because that is the point of no return. Some painters tape off the front two inches of each tread and apply a second, thicker coat of grip additive just at the nose. The extra texture at that strip does not look odd. It looks intentional, and it works far better than a uniform coat everywhere.
The Additive Question: Silica, Aluminum Oxide, and Grit
There are two ways to get traction in paint. One is to buy paint that already has texture mixed in. The other is to add grit yourself. The first option is simpler and more predictable. The second gives control over how aggressive the surface feels and where the texture lands.
For mixing in, the standard choice is fine silica sand, the kind sold for sandblasting or for adding to joint compound. A 100-grit silica gives a surface that grabs without feeling like sandpaper. A 60-grit reads as aggressive and will wear out socks and bare feet quickly. Aluminum oxide, the same material used in sandpaper, is harder and lasts longer but is harder to find in small quantities. Some paint stores carry a purpose-made additive called non-slip floor additive or grip medium. These are usually a blend of silica and a binder that helps the particles stay suspended in the paint instead of sinking to the bottom of the can.
The mixing method matters more than the grit size. If the additive is dumped in and stirred once, it will settle. The paint needs to be stirred thoroughly, then stirred again just before each dip of the brush or roller. Even then, the first batch out of the can will have less grit than the last. The better way is to mix a small amount of paint and additive in a separate container, enough for one or two treads at a time, and stir constantly. This keeps the texture even and avoids the problem of a gritty paint that has turned to a smooth pour by the time the can is half empty.
A cheaper and faster alternative is to paint the treads with ordinary floor paint and then, while the paint is still wet, sprinkle fine sand or an additive over the surface. The paint grabs the grit as it dries, and the excess is swept off the next day. This method has a ragged look up close, but on a staircase seen at a normal distance it reads as texture. It also places the grit exactly where it is thrown, which makes it easier to build up the nose of each tread without making the whole step feel like a file.
Paint Types That Actually Hold Up on Stairs
Latex porch and floor paint is the default for a reason. It dries fast, cleans up with water, and holds color well. Its weakness is durability at the nose. Oil-based porch enamel lasts longer and builds a harder film, but it takes a day or more to dry, smells strong, and turns yellow in low light. A third option, the two-part epoxy floor paints sold for garage floors, is the toughest of the group. It bonds to almost anything, resists chipping, and shrugs off the flex at the nose. It also costs more and requires careful mixing, and once the two parts are combined the clock starts running. An epoxy-coated stair will not need repainting for many years, which on a staircase is either a blessing or a curse depending on whether the color will still be wanted in a decade.
The single best choice for a wood stair that gets heavy use is a latex porch paint with a generous dose of additive, topped with a clear polyurethane or a second coat of the same paint. The polyurethane adds a hard, slick layer over the texture, which seems wrong but is not. The texture particles poke through the clear coat and still grab a shoe. The clear coat protects the color and, more important, keeps the paint from wearing thin at the nose. A person who skips the topcoat gets a stair that looks good for a year and then starts showing bare patches exactly where feet land.
Metal stairs present a different problem. Paint needs to bite into bare metal, which means the old finish needs to come off entirely. Rust needs to be ground or treated. A self-etching primer is the right base for bare steel. On aluminum, no primer is needed, but the metal must be clean and dulled. Metal stairs also conduct temperature, which means a painted metal tread in direct sun can get hot enough to soften some paints. A heat-resistant or direct-to-metal paint is worth the extra money if the stair is outdoors.
The Case for Rubber Nosing Strips Over Paint
There comes a point where paint is not the right answer. If the stair is steep, narrow, or constantly wet, or if the household includes an older person or a child, a rubber nosing strip is a better investment than any amount of textured paint. These strips screw or glue over the front edge of each tread and provide a raised, ribbed surface that grabs a shoe even when wet. They come in black, brown, gray, and sometimes clear. They add a visible line across each step, which itself is a safety feature: the eye registers the contrast and the brain processes the edge of the stair more quickly.
The downside of rubber nosing is cosmetic. It looks like what it is: a safety device bolted onto the stair. On a historic staircase or a set of treads with nice wood grain, that look can be a dealbreaker. The compromise is a thin aluminum nosing with a narrow rubber insert, which reads as a metal edge rather than a rubber mat. These are common in commercial buildings and are available at big-box hardware stores in lengths that can be cut with a hacksaw. They are harder to install than paint but not hard. A drill, a set of masonry or wood anchors, and a half hour per tread is the whole job.
The strongest case for nosing strips is long-term cost. A painted stair with grip additive needs repainting every few years at the nose, and the paint job is a full-day project that takes the stair out of service. A nosing strip screws on once and lasts a decade or more. For a back stair that gets heavy daily use, the strip wins on every measure except looks. For a front stair that guests see first, paint with additive is the better compromise.
Application Mistakes That Ruin a Grip Paint Job
Most grip paint failures come from the same three mistakes. The first is painting over an old finish that was not cleaned or scuffed. Paint bonds to a surface by mechanical grip. A smooth, glossy old coat gives it nothing to hold onto. The fix is a thorough wash with a degreaser, a light sanding with 120-grit paper, and a wipe-down to remove the dust. On a stair, this is miserable work, which is why so many people skip it and pay for it later with peeling paint within six months.
The second mistake is applying the paint too thick. Thick paint looks smooth when wet and dries to a surface full of brush marks and bubbles. The grip additive helps hide this, but the underlying problem remains: a thick film takes longer to cure and is more likely to chip at the nose. The correct approach is two thin coats rather than one heavy coat. The first coat seals the wood and provides a base for the texture. The second coat carries the additive and finishes the surface. A person who rushes and does one thick coat gets a stair that feels grippy for a month and then starts to flake.
The third mistake is walking on the stair before the paint has fully cured. Latex paint dries to the touch in an hour but takes several days to reach full hardness. A shoe pressed into the surface during that window leaves a permanent mark and can pull the texture out of the paint. The rule of thumb is 24 hours before light traffic and 72 hours before normal use. On a stair that is the only way to the second floor, that is a long time. Plan the job for a weekend when the upper floor can be reached another way, or paint one side of the stair at a time and rotate the handrail.
A Technique for Even Texture That Most Painters Skip
Rollers are the right tool for a stair tread, but not the standard foam roller that comes with a paint kit. A roller with a 3/8-inch nap, the kind used for walls, picks up paint and additive evenly and lays it down with a slight stipple. A foam roller leaves a glass-smooth finish that defeats the purpose of the additive. The nap also helps push the grit into the paint rather than leaving it sitting on top like loose sand.
The painters who get the most even texture work in one direction. They load the roller, roll from the back of the tread to the nose in a single pass, and do not go over it again. Going back and forth pushes the additive around and leaves streaks of bare paint between clumps of grit. One pass per section, overlapping each section by an inch, gives a uniform surface that feels the same everywhere. This is counterintuitive because a person naturally wants to roll back and forth to smooth the paint. On a grip coat, smoothing is exactly the wrong instinct.
For the nose of each tread, a stiff brush gives more control than a roller. The brush can work the paint into the edge and around the corner where the tread meets the riser. That corner is the first place a roller misses, and a missed strip there creates a smooth runway exactly where a foot slides off. A brush also lets a painter build up an extra layer of additive at the nose without making the rest of the tread rough.
How to Fix a Stair That Is Already Slippery
Not every slippery stair needs a full repaint. If the paint is in good shape but the surface has worn smooth, a clear grip additive can be applied over the existing finish. These come as a clear or translucent coat with fine grit suspended in a urethane or acrylic base. They leave the color visible and add traction without the job of stripping and repainting. The tradeoff is that a clear coat is thinner than paint and wears out faster, especially at the nose. It is a two-year fix, not a ten-year fix.
Another quick fix is adhesive tread tape, sold in rolls and cut to length. The tape has a gritty top surface and a peel-and-stick back, and it goes down in minutes. It reads clearly as a safety product, which is either fine or an eyesore depending on the stair. The tape also lifts at the edges over time, and once a corner curls up it catches toes and looks worse than the slippery stair it was meant to fix. The tape is best on a basement or workshop stair where appearance is secondary and a fast fix matters more than a clean look.
The last option is the most drastic: replace the treads entirely with a material that is inherently grippy. Rubber stair treads, sold for commercial and industrial use, come in full-tread sizes and screw directly to the stringers. They are expensive, they look institutional, and they solve the problem permanently. On a stair that has already been repainted twice, that has worn through a layer of plywood, and that a person still fears to walk down in socks, the rubber tread is not a compromise. It is the end of the road.
Color and Contrast as a Safety Measure
The grip on a stair is only part of the safety equation. A stair that is physically grippy but visually confusing is still a hazard. Depth perception on stairs is poor in low light, and a set of treads painted the same color as the floor at the top and the bottom can blend into a single ramp. The eye needs a visible line at each nose to register the edge of the step.
This is why the classic two-tone stair treatment exists: a light color on the tread body and a darker color on the nose, or the reverse. The contrast creates a horizontal line that the eye picks up even in peripheral vision. Painters who skip this for a uniform color get a stair that is harder to read, especially for someone carrying a load or descending in a hurry. A strip of contrasting paint, tape, or nosing at the nose of each tread is one of the cheapest and most effective safety upgrades available.
The color choice also affects how visible dirt and wear are. A dark tread shows dust and tracked-in debris immediately. A light tread shows scuff marks and worn patches. Neither is wrong, but a person should know what the stair will look like after a week of use. A mid-tone gray is the compromise that hides both dirt and wear and still provides enough contrast against a white riser or a dark floor. Gray is also the color that grip additives most closely match, so a touch-up at the nose does not stand out.
For the nose line itself, a bright white or a safety yellow reads best in dim light. These colors catch the beam of a nightlight or a flashlight and give the eye a hard edge to lock onto. Yellow is the traditional choice for industrial stairs because it signals caution even to someone who is not looking for a warning. On a residential stair, a narrow yellow stripe at the nose can look intentional if it is kept clean and straight. On a stair where the aesthetic matters more than the safety signal, white is the quieter choice that still does the job.
The Maintenance Reality of a Painted Stair
A painted stair with grip additive is a maintenance item, not a one-time project. The texture wears at the nose, the paint dulls where feet land, and the edges collect grime that a vacuum cannot pull out. The honest expectation is a touch-up every year and a full repaint every three to five years, depending on traffic. A person who wants zero maintenance should choose nosing strips or rubber treads and accept the industrial look.
The touch-up itself is simple if the original paint color and additive are kept. A small brush, a quarter cup of paint, a pinch of additive, and ten minutes per tread is the whole job. The key is doing it before the bare wood shows, because once the wood is exposed, moisture gets in and the paint around the bare spot starts to lift. A stair that is touched up at the first sign of wear stays sealed and sound. A stair that is ignored until the damage is obvious costs a full stripping job.
Cleaning is the other maintenance item. Gritty paint collects dirt in its texture, and the dirt fills the low spots until the surface becomes smooth again. A broom or vacuum with a brush attachment is the right tool. A mop pushes dirt into the texture and leaves a film that reduces grip. Once a month, a stiff brush and a bucket of soapy water, scrubbed along the grain of the texture, keeps the grit exposed. This sounds like more work than it is. A set of twelve treads takes twenty minutes.
The stair that gets the most respect in a house is the one that is both visually clear and physically secure. That respect comes not from one product but from a combination chosen deliberately: a paint that bonds to the substrate, an additive that grabs a shoe, a nose treatment that survives the impact, and a color line that tells the eye where the step ends. Each element is simple. The skill is in not skipping any of them.