
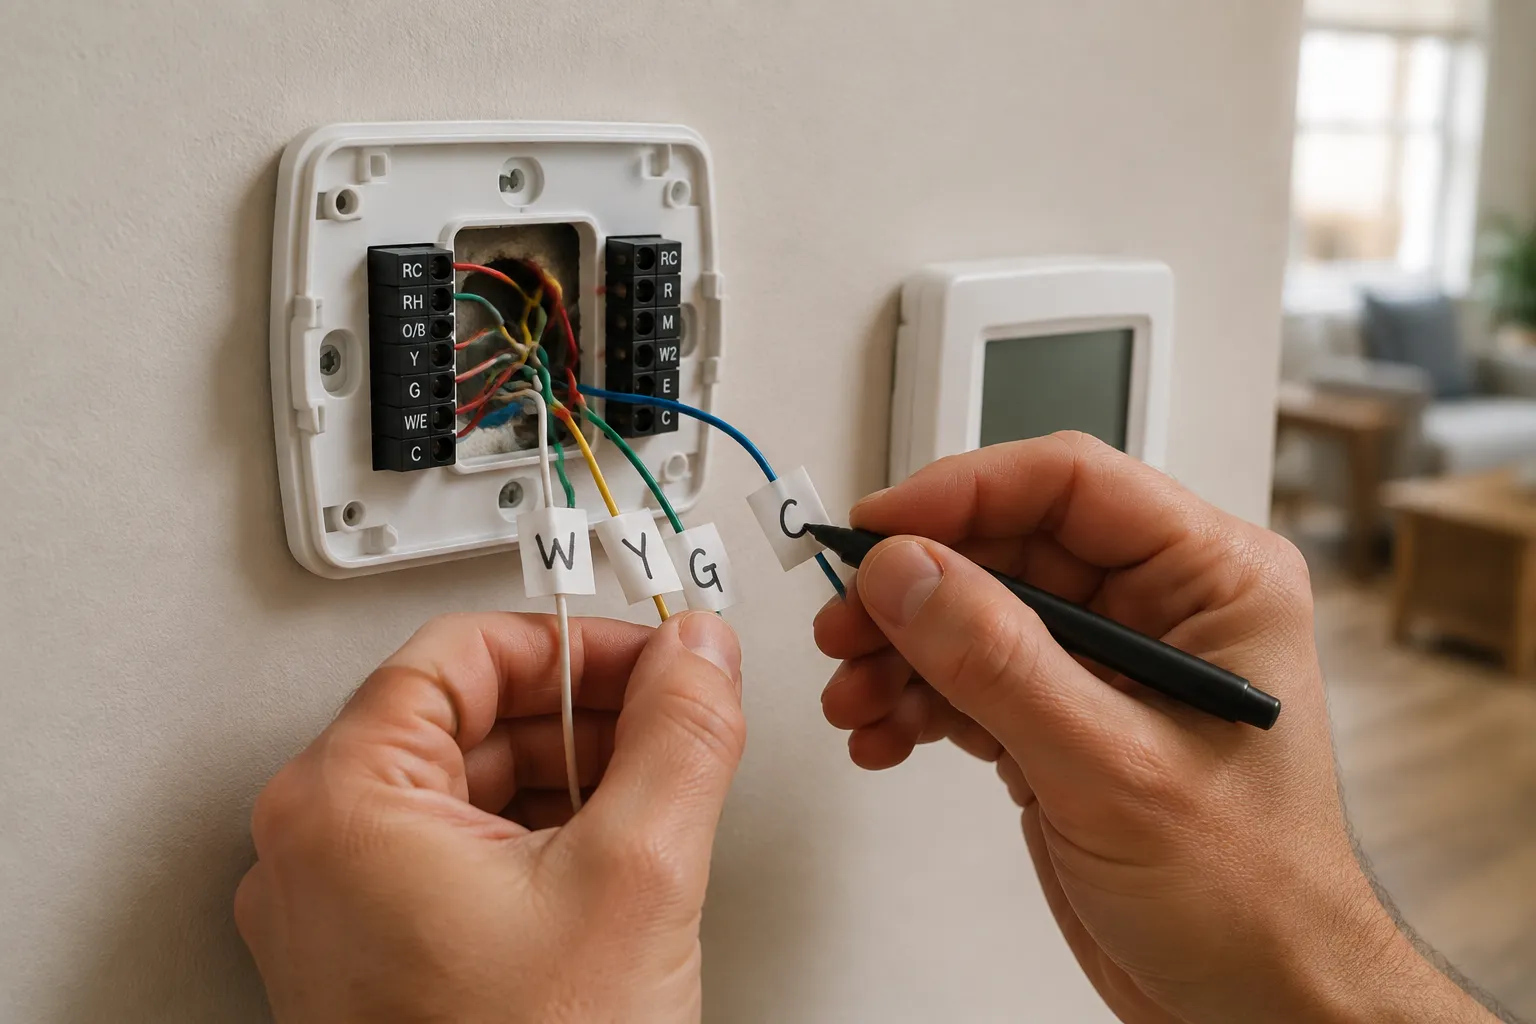
The last thing most people do before removing an old thermostat from the wall is take a photo of the wires with their phone. Then they carry that photo to the new thermostat's base plate, stare at it, and realize the labels on the old wires (if there are any) do not match the terminal names on the new unit. The photo captures a tangle of colored wires, but it does not capture which wire actually does what. This is how a fifteen-minute swap becomes a Saturday afternoon of confusion and, in the worst cases, a call to an HVAC technician who charges a trip fee just to reattach three wires that were never disconnected in the first place.
Wire labeling before a thermostat swap is not about being tidy. It is about translating the existing system's wiring scheme into a language the new thermostat can understand. The colors do not reliably mean anything. The old thermostat's terminal letters might not match the new thermostat's terminal letters. And the wire colors that a homeowner assumes are standard (red is power, white is heat, green is fan) are frequently wrong in houses that have been touched by previous owners, handymen, or half-remembered DIY projects from the 1980s.
The Color Code Is a Suggestion, Not a Law
A new thermostat's instruction manual usually includes a small chart showing typical wire colors and their functions. Red for 24-volt power, white for heat, yellow for cooling, green for fan, blue or black for common. The chart is a useful starting point for a brand-new installation in a brand-new house. It is almost useless for a swap in a house built before 2000, or any house where a prior occupant thought they knew what they were doing.
Thermostat wire is inexpensive, and installers historically grabbed whatever spool was on the truck. A blue wire might be the common wire in one house and the heat wire in another. A white wire might control the fan if the installer ran out of green. The only way to know what a wire actually connects to is to trace it to its termination point, either at the furnace control board or at the outdoor condenser unit. That is the ground truth. Everything else is a guess dressed up as experience.
For a person swapping a thermostat in a house they have lived in for years, the furnace control board is usually accessible. It is often behind a panel in the utility closet or basement. The terminal strip on that board has labeled screws: W for heat, Y for cooling, G for fan, R for power, C for common. Matching the wire at the thermostat to the screw at the furnace tells a person exactly what that wire does, regardless of its color. This takes ten minutes and eliminates nearly all guesswork.
Old Thermostat Terminal Letters Are a Different Language
Older thermostats, especially mercury-switch models from the 1970s and 1980s, used terminal designations that newer units do not. An old unit might label the power terminal as Rh and Rc, or simply R, while a new smart thermostat might have a single R terminal or separate Rh and Rc terminals that need a jumper. Some old units used the letter M for the common wire. Others used a terminal labeled 4 or 6. A person who writes down "M" from the old unit and searches the new thermostat's manual for a terminal labeled M will find nothing, because the new unit calls that same function C.
The fix is to ignore the old thermostat's labels entirely and rely on the furnace control board as the source of truth. Write down each wire's color and where it lands on the furnace board. Then map that to the new thermostat's terminals. If the furnace board labels a terminal W and the wire connected to it is blue, then the blue wire goes to the W terminal on the new thermostat. This process converts the old system's arbitrary labels into a clean, accurate map.
Skipping this step leads to the most common smart thermostat installation error: swapping the R and C wires. A reversed R and C connection can blow the fuse on the furnace control board or, in older systems, damage the transformer. The thermostat itself might power on briefly and then die. The homeowner then assumes the thermostat is defective, returns it, and buys a different brand, only to repeat the same mistake because the wires were never properly identified.
The Photo Trap and the Labeling Method That Works
The phone photo of the old thermostat's wiring is useful for one thing only: remembering which wire went to which old terminal. That information matters because it tells a person which wires were actually used. A five-wire cable might only have three wires connected at the thermostat; the other two are clipped and unused. The photo shows that. What the photo does not show is whether those unused wires are connected at the furnace end. Sometimes they are. Sometimes they are not.
The reliable labeling method uses small adhesive labels or pieces of masking tape applied to each wire before disconnecting anything. Each label should carry the furnace board terminal designation, not the old thermostat terminal designation. Write W, Y, G, R, and C on the labels based on where each wire lands at the furnace. If a wire at the thermostat is not connected at the furnace end, label it "spare" and do not connect it to the new thermostat. Connecting a spare wire that is loose at the furnace end creates a floating connection that can cause erratic behavior or, in some cases, a short.
Labeling in this order matters. A person should check the furnace board first, then label the wires at the thermostat, then remove the old thermostat. This sequence prevents the common mistake of labeling wires based on the old thermostat's terminals and then having to re-label everything when the new unit's terminal layout is different. The furnace board is the constant. Everything else is a variable.
The Common Wire Question Decides Everything
Most smart thermostats require a C wire, or common wire, to power their displays, Wi-Fi radios, and internal processors. Some models can run without one by stealing power from the R wire when the system is idle, but this workaround is unreliable with heat-only systems and older furnaces. The presence or absence of a C wire at the thermostat is often the single deciding factor in whether a swap is straightforward or requires a workaround.
The C wire is the one wire that people consistently misidentify. In a four-wire system, the common wire is frequently blue or black, but it can be any color. The only way to confirm a C wire is to find it at the furnace control board connected to the C terminal. A wire that is blue at the thermostat but connected to the B terminal at the furnace is not a C wire; it is a reversing valve wire for a heat pump system. Connecting that to the C terminal on a new thermostat can damage the new unit's electronics.
If no C wire exists, the options are a thermostat that explicitly supports power stealing, an add-a-wire adapter installed at the furnace, or pulling new thermostat cable. The add-a-wire adapter is a small device that combines signals from existing wires to free up a conductor for common power. It mounts at the furnace control board and requires a person to identify the thermostat wires at the furnace correctly. The same labeling discipline applies there: label the wires at the furnace before disconnecting anything, because the adapter changes the termination points.
Heat Pump Systems Add Two More Wires to the Puzzle
A heat pump system uses the same R, Y, G, and C wires as a conventional system, but it adds wires for the reversing valve and auxiliary heat. The reversing valve wire is typically labeled O or B, depending on the manufacturer and the valve's default position. A person swapping a thermostat on a heat pump must know whether the system's reversing valve energizes in heating mode or cooling mode. Getting this wrong means the system will blow cold air when set to heat and warm air when set to cool.
The labeling method for a heat pump is identical to a conventional system: trace each wire to the furnace or air handler control board, label according to the board's terminal markings, and map to the new thermostat. The difference is that heat pump systems have more wires, which means more chances for a mistake. A person who labels a wire as W for auxiliary heat but actually connects it to the emergency heat terminal will discover the mistake on the coldest night of the year, not during the installation.
Not every thermostat supports heat pump configurations. Some budget smart thermostats only handle conventional heating and cooling. A person who buys one of those for a heat pump system will find the installation manual has no section for O/B wires, and the thermostat's menu will not offer a heat pump option. Checking the new thermostat's compatibility list before pulling the old unit off the wall saves a return trip to the store.
Two-Stage Equipment Complicates the Simple Map
A two-stage furnace has a first stage for moderate heating and a second stage for extreme cold. Its control board has two heat terminals, usually labeled W1 and W2. The thermostat must connect to both and decide when to call for the second stage. The same applies to two-stage cooling, with Y1 and Y2 terminals. A person swapping a thermostat on a two-stage system needs a thermostat that supports multiple stages. Many entry-level smart thermostats do not.
The labeling process for a two-stage system requires identifying which wire at the thermostat connects to W1 and which connects to W2 at the furnace. The colors are often identical, which means two wires of the same color are in the bundle. This is where the labeling becomes critical: a person who swaps W1 and W2 during the swap will find the system still heats, but it may short-cycle or run the second stage too early. The house heats unevenly, and the furnace cycles more often than it should, which wears out the blower motor and increases the utility bill.
When two wires share a color, the labeling method should include a secondary identifier. Write "W1 blue" on one label and "W2 blue with tape mark" on the other, or use different colored labels for each. The furnace control board trace makes this distinction possible. Without it, a person is guessing which blue wire is which, and that guess is a coin flip.
The Spare Wire Is Never Actually Spare
A thermostat cable often contains more conductors than the system uses. Eighteen-gauge thermostat wire commonly comes in five conductors: red, white, yellow, green, and blue. A system that only needs four wires leaves one unused at both ends. That spare wire is the single most valuable asset in a thermostat swap because it can become the C wire.
If a spare wire exists in the cable, it is worth checking whether it reaches the C terminal at the furnace. Often it runs from the thermostat to the furnace but terminates at an unused screw or is clipped short. Moving that wire to the C terminal at the furnace and labeling it at the thermostat creates a proper C wire without pulling new cable. This is a common and safe modification, but it requires the same discipline: confirm the wire is truly unused at the furnace end, then label it before touching anything.
An unused wire that is connected at the furnace but not at the thermostat is a different problem. It is energized or floating at one end, and if it touches another terminal during the swap, it can cause a short. Taping off the ends of unused wires before installation is standard practice. Leaving them exposed in the wall cavity behind the new thermostat is asking for trouble, especially if the new thermostat's base plate is metal and the wires shift during the mounting process.
The Order of Operations That Prevents the Saturday Call
The entire labeling process fits into a sequence that takes about twenty minutes with the power off. Shut off the furnace or air handler at the breaker. Remove the old thermostat's cover. Take a photo for reference. Go to the furnace, open the control board panel, and identify every wire connected to the thermostat cable. Label each wire at the thermostat according to its furnace terminal. Tape off spare wires at both ends. Remove the old thermostat base plate. Mount the new base plate. Connect each labeled wire to the matching terminal on the new unit. Restore power. Walk through the setup menu and verify the system responds to each call for heat, cool, and fan.
This sequence works because it puts the most important identification step (the furnace trace) before the removal step. The moment the old thermostat comes off the wall, the wires are free to move, and the memory of which wire was where starts to blur. The labels from the furnace trace remove the dependency on memory entirely. A person can take a break mid-installation, come back, and still know exactly which wire is which. The labels do the remembering.
People who skip the labeling because they are in a hurry rarely save time. They spend the same twenty minutes searching for answers online, posting photos of their wiring to forums, and waiting for a stranger to decode their mess. The labeling is not a bureaucratic step. It is the actual work of the job. The swap itself is just connecting labeled wires to matching terminals, which is the easy part.