
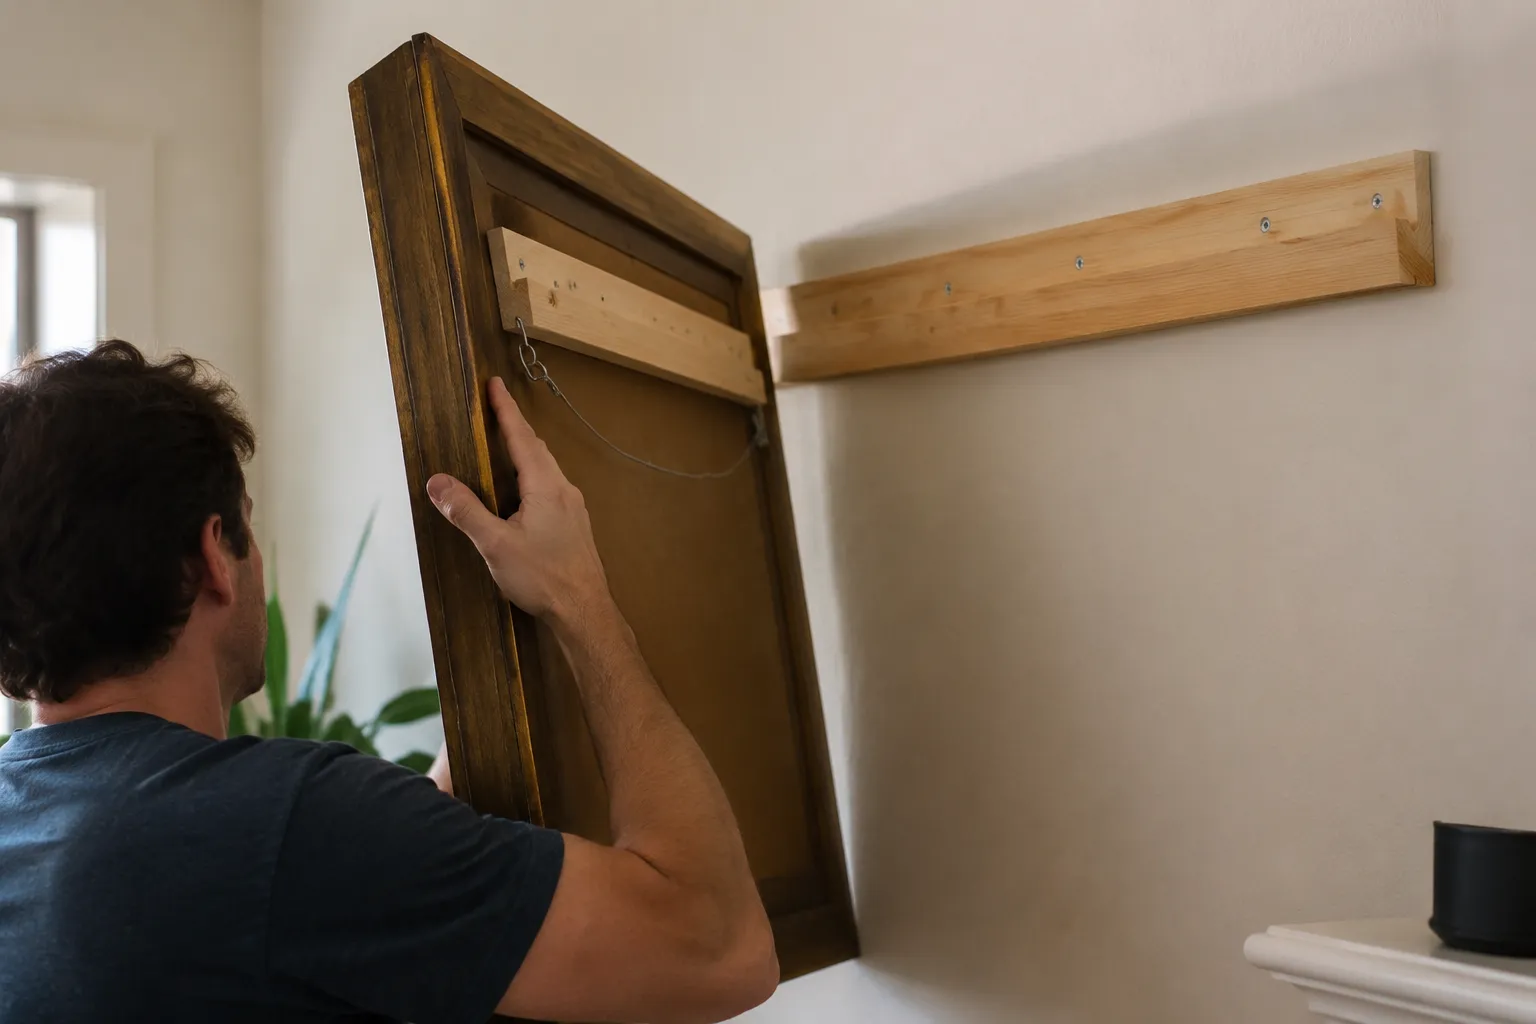
A wall anchor rated for fifty pounds fails most often because the screw pulls straight out of the plaster, not because the anchor crumbles. That is the failure mode a French cleat eliminates before it ever becomes a problem. Two interlocking beveled edges, one fixed to the wall and one fixed to the frame, transfer the load downward into the wall fasteners instead of prying against them. The heavier the frame, the more the cleat digs in. This is the hanging method that turns a heavy mirror or a large framed print into a one-time installation, and it deserves more use than it gets.
Most people hang heavy things using a pair of D-rings or a wire strung between two screws. That works fine until the frame gets bumped, or until a person leans against it while dusting, and the whole assembly tilts forward and drops the bottom edge off the wall. A French cleat removes that risk because the frame is locked onto the wall. There is no wire to stretch, no ring to slip, no single screw carrying the whole weight while the other screw just keeps the piece level.
The Geometry That Does the Work
Cleat the wall piece at 45 degrees so it slopes upward into the room. Cleat the frame piece at the same 45 degrees, but sloping upward into the frame. When the frame piece slides down onto the wall piece, the two beveled faces mate completely, and the weight of the frame presses the angled surfaces together. The downward force resolves into two vectors: one pressing the wall cleat against the wall, and one pressing the frame cleat against the wall cleat. The whole assembly behaves like a single block of wood screwed to the wall, rather than like a hook holding a wire.
The strength comes from shear, not from tension. A screw driven into a stud resists straight pullout well enough, but it resists sideways shear even better. A French cleat converts the frame's weight from a pullout force into a shear force. The screws holding the wall cleat to the studs are loaded sideways, which is the direction they are strongest in. The screws holding the frame cleat to the frame are loaded sideways too, into the frame's back. That is why a cleat made from a single 1x4 can hold a fully loaded bookcase, and why a 3/4-inch plywood cleat can hold a large mirror that two D-rings would absolutely fail to secure.
The bevel angle matters. Forty-five degrees is the standard because it is easy to cut with any circular saw or table saw, and because it provides the best balance between grip and clearance. A steeper angle, like 30 degrees, holds even more weight but requires the frame to be positioned higher on the wall, because the cleat bites deeper. A shallower angle, like 60 degrees, is easier to slip on and off but holds less weight. For anything over 40 pounds, stick with 45 degrees and make the cleat as long as the frame is wide, or close to it.
Cutting the Cleat Without a Table Saw
A table saw makes quick work of a French cleat: set the blade to 45 degrees, rip a strip off a 1x4, and the job is done in under a minute. But many people do not own a table saw, and they assume the method is off-limits. It is not. A circular saw with a guide clamped to the board cuts the same bevel, as long as the blade is sharp and the saw is run slowly and steadily. The cut will have a few blade marks, but the cleat is hidden behind the frame, so appearance does not matter.
A router with a 45-degree chamfer bit also works, and it leaves a cleaner edge than a circular saw. The router does not need to be a heavy-duty model. A palm router with a 1/2-inch chamfer bit cuts through a pine 1x4 in two passes. Clamp the board to a workbench, run the router along the edge, flip the board, and repeat. The result is a bevel that is consistent along the entire length, which is what matters for a full, even bite.
For people who want to avoid power tools entirely, there is a simpler route. Buy a ready-made cleat kit. Several manufacturers sell extruded aluminum cleats in 12, 24, and 36-inch lengths, with the 45-degree bevel already machined into the profile. These are rated for several hundred pounds per linear foot, and they come with mounting screws. The aluminum versions are slimmer than wood, which means the frame sits closer to the wall, and they do not swell or shrink with humidity changes. A wood cleat in a damp basement can warp enough to reduce the contact patch. Aluminum does not.
Screw Selection and Stud Placement
The cleat is only as strong as the screws holding it to the wall, and the wall is only as strong as what is behind it. A cleat screwed into drywall alone with 1-1/4-inch drywall screws will hold a 20-pound frame, maybe. A cleat screwed into a stud with 3-inch #10 wood screws will hold several hundred pounds. The difference is not subtle. For anything heavier than 30 pounds, find the studs first and put at least two screws into each stud the cleat crosses.
Stud finders are unreliable on plaster walls, and they often give false positives on walls with lath. The more dependable method is to drill a tiny test hole and feel for resistance. A 1/8-inch drill bit passes through drywall easily, stops hard at a stud, and passes through empty cavity with no resistance. A person can map the studs with a few test holes in under a minute, and the holes are small enough to hide behind the cleat.
When the frame is very heavy, 75 pounds or more, run the screws through the cleat and into the studs, then also add a drywall anchor at the ends of the cleat if there is no stud nearby. The anchors will not carry much of the load, but they keep the cleat from flexing and pulling its outer edges off the wall. The stud screws carry the real weight. The anchors just keep the cleat flat.
For the frame side, the screws go through the cleat and into the frame's back frame, not into the thin plywood panel in the center. A large framed mirror has a solid wood frame around the perimeter, typically 1-1/2 to 3 inches wide. Position the cleat so it sits centered on that frame, and use screws long enough to bite at least 3/4 of an inch into the wood. For a frame with a thick decorative molding, use a spacer behind the cleat to keep it flush against the flat part of the frame's back.
Leveling Is a Two-Person Job, and the Cleat Makes It Easier
Hanging a frame with a wire and D-rings involves a frustrating dance: lift the frame, mark the wall, lower the frame, move the hook, lift the frame again, adjust, repeat. A French cleat simplifies the process to one decision. Mount the wall cleat level, mount the frame cleat on the frame, and the frame hangs level automatically. The mating of the two beveled surfaces self-centers the frame left and right, as long as the wall cleat is level.
The wall cleat must be dead level. A 1/8-inch tilt over a 24-inch cleat results in the frame hanging visibly crooked, and there is no adjustment afterward. The frame cleat on the frame, however, does not need to be level at all. It just needs to be parallel to the frame's top edge. The wall cleat is the one that sets the final orientation.
A laser level is the easiest tool for this. Clamp it to the wall, adjust until the line is level, and mark the screw holes directly along that line. A spirit level works too, but it requires holding the cleat against the wall while marking, which is awkward. A simpler method: screw the wall cleat loosely to the wall through one screw hole, set a level on top of the cleat, adjust the other end, and mark that screw hole. Then drill and drive the rest of the screws.
Positioning the cleat at the right height requires a bit of math. Measure the distance from the top of the frame cleat to the top of the frame. That distance, plus the height of the wall cleat, tells where the wall cleat should sit. A person can mark the wall, then hold the frame up to check the fit before committing to the final screw holes. Because the frame slides down onto the cleat, it sits lower than the point where the two pieces first contact. Plan for the final resting position, not the first contact.
The Frame Keeps the Cleat Invisible
Standard picture-hanging hardware leaves a visible gap between the top of the frame and the wall. A wire hangs from two screws, so the frame tilts forward at the top and the bottom edge presses against the wall. For a small frame, that lean is negligible. For a large, heavy frame, the lean is obvious, and the top edge can sit a full inch away from the wall. This is the look most people associate with hanging a big mirror, and it reads as slightly off even when the frame is straight.
A French cleat eliminates the gap because the frame sits almost flush against the wall. The wall cleat adds about 3/4 of an inch of thickness, and the frame cleat adds another 3/4 of an inch, so the frame hangs about 1-1/2 inches off the wall. That is close enough that the shadow line is minimal, and the frame reads as mounted rather than hung. For a heavy frame, this is the difference between a professional installation and a temporary one.
There is one thing a French cleat makes more difficult, and it is worth acknowledging. The frame cannot be lifted straight off the wall. It must be lifted up and then pulled away from the wall, which requires about 2 inches of clearance above the frame. For a frame that sits within 2 inches of the ceiling, that clearance may not exist. In that case, the frame is permanently installed until it is slid sideways off the cleat, which works if the cleat is short enough to clear the frame's side stops. This is a trade-off. The security of the cleat comes at the cost of easy removal.
The Weight Range Where the Cleat Makes Sense
A small 8x10 frame in a lightweight wood molding does not need a French cleat. A single picture hook rated for 20 pounds works fine, and the frame can be repositioned in seconds. The cleat starts to make sense around 30 pounds, where a wire and D-ring setup becomes visibly strained. At 40 pounds, the cleat is the right choice. At 50 pounds and above, the cleat is the only choice that makes sense for a permanent installation.
For a 100-pound mirror, a horizontal cleat spanning 36 inches across two or three studs is the difference between a safe install and a catastrophic one. The same mirror hung on a wire would require a hook rated for at least 150 pounds, a stud finder with a reliable reading, and even then, the wire could slip. The cleat distributes the load across the entire width of the frame, so no single point carries more than a fraction of the weight.
The cleat also protects the frame itself. A heavy frame hung on two D-rings concentrates the entire weight on two small screws driven into the frame's back. Over years, those screws can work loose, especially if the frame is in a room with temperature swings that cause the wood to expand and contract. The frame cleat spreads the load across a much larger area, so the frame's wood is stressed far less. For a valuable frame, this is a real consideration.
A Better Method for a Common Problem
The French cleat is not a new invention. Cabinetmakers have used it for centuries to hang heavy wall cabinets, and framers use it to attach wainscoting and paneling. But it has never become the default method for hanging pictures and mirrors, which is strange because it solves the problems that make people dread the job. The wire slips. The hook pulls out. The frame leans. The cleat eliminates all three failures at once.
The tools required are basic: a saw to cut the bevel, a drill to drive screws, a level to set the wall piece. The materials cost a few dollars for a length of 1x4 or a pre-made aluminum profile. The installation takes less time than a wire-and-hook setup, because it is done once and done correctly. For the next heavy frame that needs to go on a wall, this is the method to reach for.