
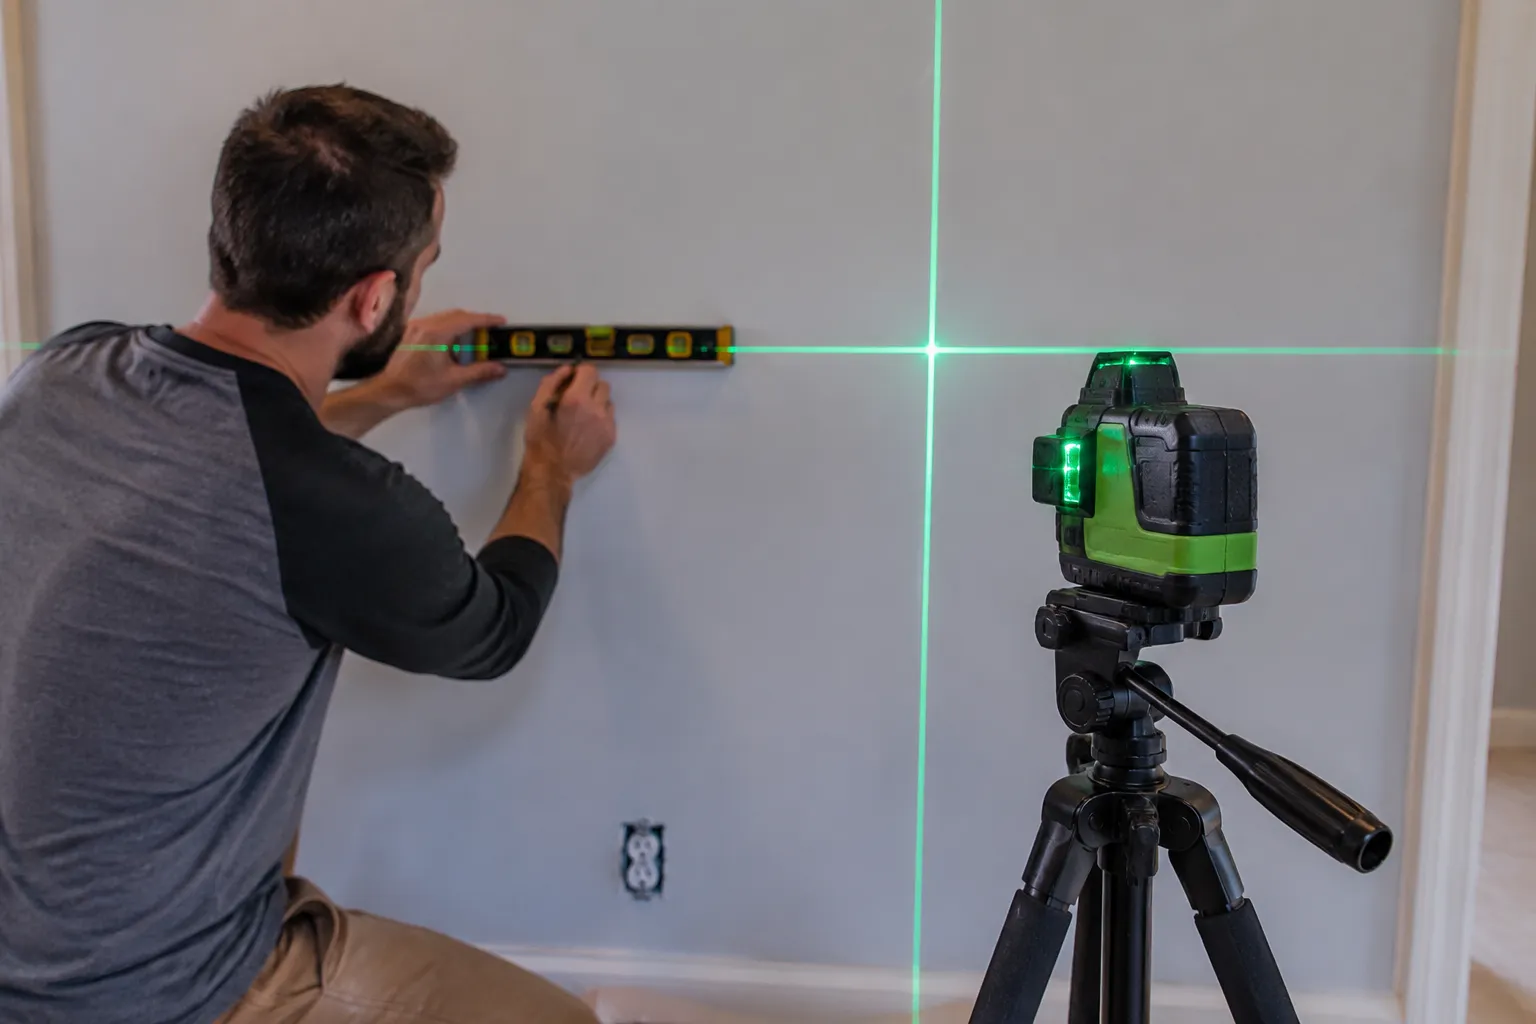
The laser level has been the most quietly transformational tool in remodeling for about two decades now, and the wall layout is where it earns its keep. A person can hang a shelf, tile a shower, or run wainscoting with a bubble level and a string line, and it will come out fine. But "fine" is doing a lot of work in that sentence. The laser level does not make a person more careful. It removes the need to be careful in the first place, which is a different thing entirely, and it is why straight installs stopped being a matter of patience and started being a matter of setup.
The tool itself is simple. A diode projects a beam, a prism or a spinning mirror turns that beam into a line, and a pendulum or an electronic sensor keeps that line true to gravity. The self-leveling feature is the part that matters. Older rotary levels required a person to level the unit by hand on a tripod, and they drifted. The modern self-leveling unit locks when it is within a few degrees of level, calibrates itself, and then holds that plane with a consistency no human hand can match. That is the entire revolution. The tool does the geometry, and the installer just has to honor the line it draws.
The mistake most people make is treating the laser as a fancy pencil. They set it on a table, turn it on, and start marking the wall wherever the line lands. That works for a single shelf. It fails for anything with multiple planes, multiple walls, or a run longer than a few feet. The laser is not a marking tool. It is a reference system. The difference sounds like semantics, but it is the difference between a straight shelf and a straight room.
The first setup decision is the height
Before turning anything on, a person needs to decide what height the line will live at. This sounds obvious, but it is where most layouts go wrong. A line set at 12 inches off the floor is useless for a backsplash that runs 18 to 36 inches. A line set at 48 inches is useless for baseboard. The laser needs to be placed with the final install in mind, not just placed wherever there is a flat surface.
For a full wall layout, the single most useful height is the middle of the work area or, better yet, the top edge of the tallest element being installed. If a person is tiling a shower from floor to ceiling, the line should sit near the top of the tile field, around 78 inches, so every course below can be measured down from it. If the line sits lower, the installer ends up leaning over it, blocking it with their body, and reading it at an angle. A line at chest height or above is visible, unobstructed, and easy to work from.
There is a second logic to setting the line high. Measurements taken downward against gravity are easier to read than measurements taken upward, because a tape measure hangs naturally and the eye reads the numbers without parallax. Every course of tile, every shelf bracket, every piece of trim gets measured down from a single fixed reference. That one decision, made once at the start, eliminates the accumulated error of measuring each row from the row below it.
Tripod versus wall mount versus floor
The placement of the laser itself matters more than the brand of laser. A tripod is the best option for most rooms because it gets the unit off the floor, puts it at a workable height, and allows fine adjustment of the left-right position. The legs take up floor space, which is annoying in a tight bathroom, but the stability is worth it.
A wall mount bracket is the better choice for long runs of wainscoting or for rooms where the floor is crowded with material. The bracket screws to the wall, holds the laser against the surface, and projects a line parallel to the wall at a fixed distance. That distance becomes a constant. Every piece of trim gets set to that same standoff, and the install becomes a matter of butting material to the line rather than measuring each piece.
Setting the laser directly on the floor is the weakest option, but it has one legitimate use. When laying out floor tile, a line projected across the floor at a low angle is the fastest way to establish a reference grid. The unit sits on a small block or a folded towel to keep it off the wet thinset, and the line crosses the room at working height. It is not precise for vertical work, but for a floor layout it is the only setup that makes sense.
Reading the line instead of marking it
The core skill of laser layout is knowing when to mark and when to work directly to the beam. Working directly to the beam is faster. Setting a piece of wainscoting so its top edge kisses the red line, then checking the bottom gap with a shim, takes half the time of marking a pencil line first. The laser line is thin, usually around 1/16 inch at close range, and the naked eye can hold a piece of trim against it with surprising accuracy.
Marking is necessary when the line will be removed before the install. For a backsplash that will be tiled over the next day, the laser cannot stay running overnight, so a person transfers the line to the wall with a pencil. The trick is to mark at the same angle every time. A person naturally looks at the line from their own eye height, and that angle creates parallax. Marking a dozen points along the wall, each from a slightly different standing position, produces a wobbly line even if the laser was perfect.
The fix is to mark from one fixed position. Set the laser, stand in one spot, and mark each point without moving the feet. The angle of view stays constant, and the marks land on the true line. For a long wall, marking every 16 inches from a single position is enough to snap a chalk line later, and the chalk line will be dead straight because every mark was taken from the same perspective.
Plumb lines and the second axis
A single horizontal line solves the level problem, but most wall installs also have a vertical problem. Tile patterns, paneling seams, and even a row of picture frames all need plumb references. The solution is a cross-line laser, which projects a vertical beam and a horizontal beam that intersect at a right angle. The intersection point becomes the corner of the entire layout. Every horizontal measurement comes off the horizontal line, every vertical measurement off the vertical line, and the corner where they cross is the origin point for the whole grid.
Setting the cross-line unit correctly requires a few extra seconds. The vertical line needs to be checked against a known plumb reference, like a door frame or a corner, because the self-leveling mechanism only guarantees the horizontal plane. A cross-line laser will happily project a vertical line that is offset from true if the unit is tilted on its mount. The horizontal line stays level because the pendulum compensates, but the vertical line leans. Checking the vertical beam against a door jamb or a plumb bob before committing to the layout prevents a room full of slightly leaning seams.
For a full wall layout, the vertical line is worth setting first. Plumb is harder to fix than level. A slightly unlevel horizontal line shows up in every course of tile, but a slightly off-plumb vertical line shows up as a growing gap that becomes obvious halfway up the wall. Establishing the vertical reference first, then building the horizontal line off it, gives the installer a corner that is actually square to the room rather than square to gravity alone.
The three-wall problem in bathrooms
Bathrooms are where laser layout gets genuinely difficult, because three walls meet in a small space and each one needs its own reference. A single laser can only project one horizontal plane at a time, or two if it is a cross-line unit, but the installer needs a continuous line around three walls to keep the tile courses level. The workaround is to set the laser on one wall and let the beam run across the other two. The line stays at the same height everywhere it lands because it is one continuous plane. That is the elegant part. The laser projects a plane, not a line, and every surface that plane touches gets the same reference height.
The problem is the corner. Where two walls meet, the beam wraps the corner and continues, but the visual break makes it hard to read the line across the joint. A person marking tile on both sides of a corner will often find that the courses drift by an eighth of an inch by the time they reach the inside edge. The fix is to mark a reference point near the corner on each wall, then verify those two points are at the same height with a tape measure before setting any tile. The laser gets the installer close. The tape measure confirms the corner. The combination takes ten seconds and prevents a redo that would take an hour.
The other bathroom problem is the shower niche. A niche has a bottom, a top, and two sides, and each one needs to be level and plumb relative to the surrounding tile. The laser gives the installer a horizontal line for the bottom and top, but the sides need vertical references. Setting the cross-line unit outside the shower, aimed so the vertical beam runs past the niche opening, gives the installer a plumb line to work from. The niche sides get set to that line, and the whole opening ends up square to the room even if the studs are not.
What the laser cannot fix
It is worth stating plainly that a laser cannot make a bad wall good. A bowed stud, a hump in the drywall, or a floor that slopes a quarter inch across the room will still fight the install. The laser will faithfully show how bad the wall is, and that is actually its most valuable feature. The line does not lie. When a person sets the beam across a wall and sees it drift away from the surface by half an inch in the middle of a run, that is the wall announcing its problem before the tile goes up.
The correct response is not to ignore the line. It is to fix the wall. Shimming studs, floating the drywall with compound, or ripping a filler strip to close the gap are all faster and cheaper than fighting the discrepancy with thin layers of thinset. A laser layout session that reveals a problem before the install is a successful session, even if no material gets set that day.
The laser also cannot fix a layout that was poorly planned. Knowing that the line is level does not help if the line was placed at the wrong height or if the grid was established off the wrong corner. The tool is a reference, not a plan. The planning still has to happen first, on paper or in the head, and the laser is what makes that plan real on the wall.
The red line versus the green line
Laser color matters more than most people expect. Red lasers are cheaper and more common, but they are harder to see in bright conditions. A room with direct sunlight through a window, or a space lit by bright work lights, will wash out a red beam and leave the installer squinting. Green lasers are roughly four times more visible to the human eye, and that difference is exactly what it sounds like. A green beam is visible in daylight. A green beam is visible across a large room. A green beam does not require turning off every light and closing the blinds.
The tradeoff is battery life and price. Green laser diodes draw more power, so the units run through batteries faster, and the price premium is significant. For a homeowner doing one or two projects a year, red is fine. For anyone who makes a living with the tool, the green upgrade pays for itself in the first week, because it eliminates the constant fiddling with lighting and the retakes from a beam that disappeared at the wrong moment.
There is also the question of line thickness. A beam that is 1/16 inch thick at close range spreads to 1/8 inch or more at 30 feet. That is not a defect in the tool. It is the physics of a diverging beam. For precision work at distance, the installer needs to read the same edge of the line consistently. Reading the top edge of a horizontal line every time, or the left edge of a vertical line every time, keeps the error consistent and predictable. Reading whichever edge is brighter in the moment is how a layout drifts.
A practical sequence for a first full wall
For someone standing in a bare room with a laser for the first time, the sequence is straightforward. Set the tripod in the center of the room, or at least 6 feet from the wall being laid out. A laser too close to the wall projects a line that is hard to read at an angle. Mount the unit, turn it on, and wait for the self-leveling system to stop moving. That takes about five seconds, and the line will visibly settle.
Check the height of the line against the planned install. Adjust the tripod until the line sits at the top of the work area, then lock the legs. Spin the unit or adjust the fine tune knob to bring the horizontal beam parallel to the wall. The beam does not need to touch the wall at the same height everywhere, but it needs to be close. Then check the vertical beam against a known plumb reference. If the vertical line leans, shim the unit or adjust the mount until it is true.
Mark the reference points on the wall, using the single-position method described earlier. Snap a chalk line through those marks if the run is long, or work directly to the beam if the material is being set immediately. Measure down from the line for every course of tile or every row of trim, and check the corner joints with a tape measure before committing to any adhesive. The whole process takes under ten minutes, and it replaces an hour of careful leveling with a bubble level that would have been less accurate anyway.
The result is an install where the first course is straight, every subsequent course follows the first, and the entire wall lands where it was supposed to land. That is the quiet miracle of the laser level. It does not make the work easier in the moment. It makes the work done, with nothing to rip out and redo, and that is the version of easier that actually matters.