
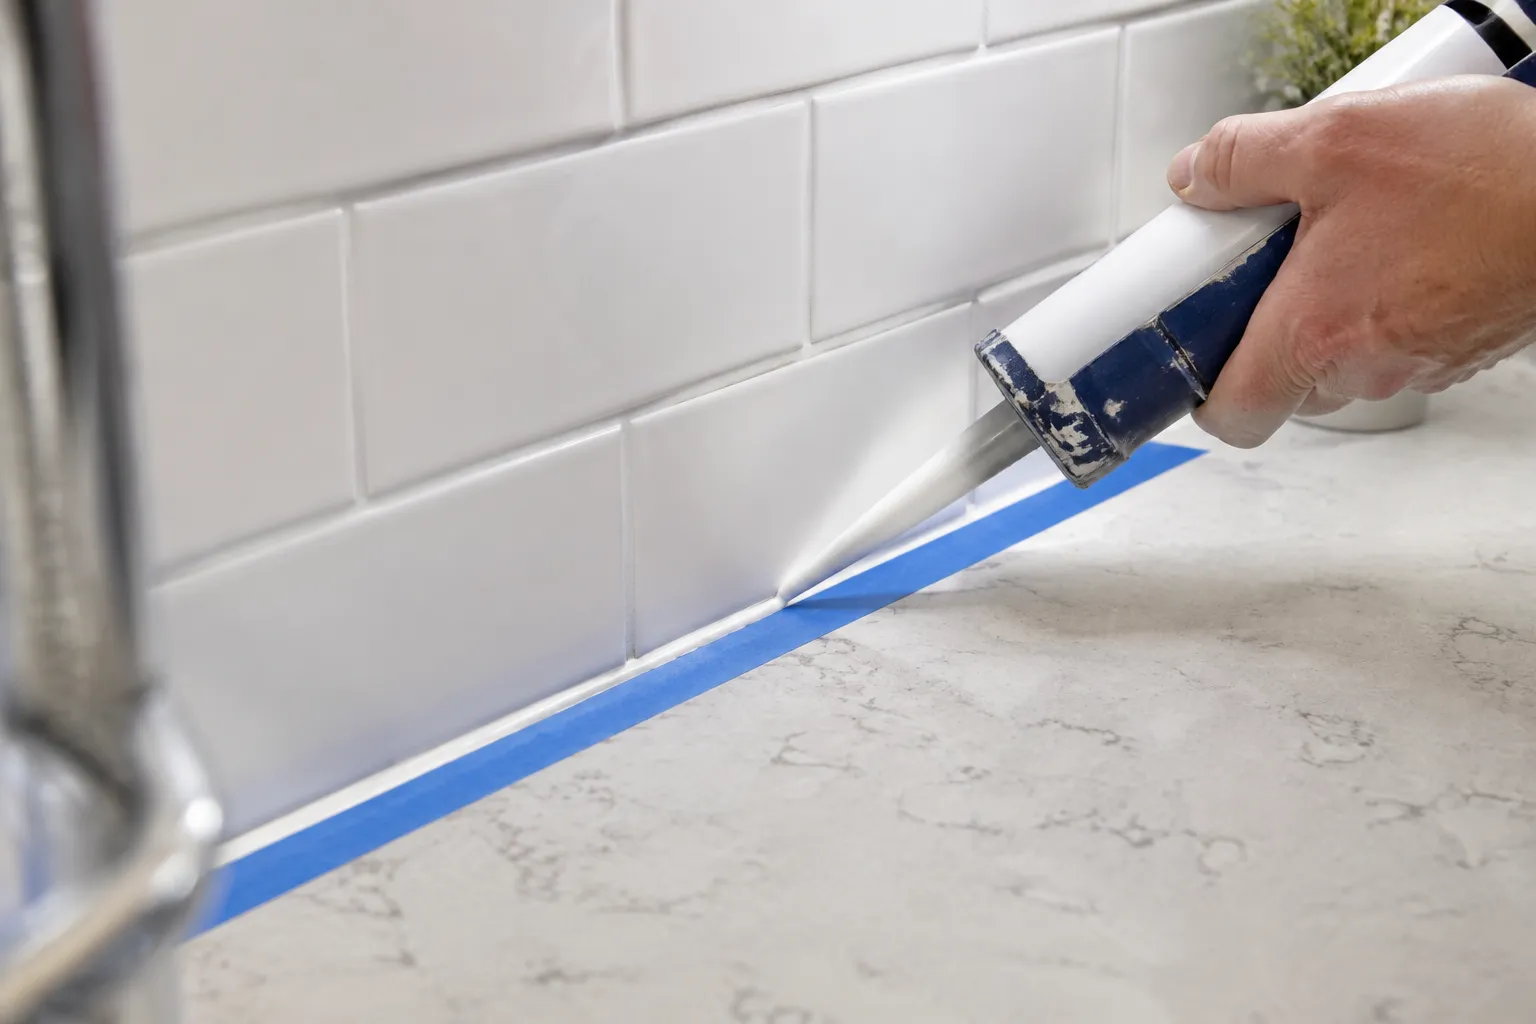
The gap between a kitchen countertop and the tile backsplash is a dirt museum. Grease vapor condenses there, crumbs migrate in, and water from a careless sponge rinse finds a permanent home. Caulking that seam is a small job with an outsized effect on how clean the kitchen looks, but most people do it badly because they treat it like squeezing toothpaste onto a brush. The result is a wobbly, uneven bead that collects grime faster than the gap ever did. The job is not difficult. It just requires a different set of movements than most people assume.
The first mistake happens before the tube is even opened. Most homeowners buy a general-purpose silicone caulk and call it a day. That is a mistake. Kitchen seams need a product that resists mildew, not just water. Standard silicone will eventually develop black speckles along the edge, especially near the sink where water pools daily. A mildew-resistant kitchen and bath silicone is worth the extra dollar. The second mistake is color. People buy white caulk because the tile is white, then wonder why the seam glows like a neon stripe. The caulk should match the grout, not the tile. If the grout is warm gray, a warm gray caulk will disappear. White caulk next to off-white tile is a constant visual interruption.
Surface preparation is where the job is won or lost, and it is the part people skip. Caulk will not stick to a layer of dish soap film or dust. The old caulk has to come out completely, not just the loose chunks. A plastic scraper or a dedicated caulk removal tool works, but a sharp utility knife is faster for the initial cut. Run the knife along both edges of the old bead, then pull the strip out with pliers. Whatever remains, scrape down to the hard surface. The goal is a clean, recessed channel between the countertop and the tile, free of any crumbling material.
Then comes the step that separates a professional result from a DIY smear. The surfaces must be wiped with a solvent. Isopropyl alcohol on a lint-free cloth removes the invisible oils from fingers and cooking residue that silicone will not bond to. This is not optional. A person can spend forty minutes on prep and ruin it by touching the cleaned joint with a bare finger. The oil from a single fingerprint is enough to make the caulk release later. After the alcohol wipe, wait a few minutes for it to dry completely. The joint should look dry, dull, and absolutely clean before any caulk touches it.
Most people skip the painter's tape, and their results show it. Tape is the difference between a line that looks drawn by hand and a line that looks drawn by a machine. Apply a strip of tape along the top edge of the tile and another along the countertop surface, leaving a narrow gap that matches the width of the joint. The tape does two things. It keeps the caulk off surfaces where it does not belong, and it forces the bead to stay within a controlled width. Press the tape down firmly, especially at the corners, so caulk does not seep underneath.
With the tape in place, the actual application becomes forgiving. Cut the nozzle of the caulk tube at a steep angle, about 45 degrees, and pierce the inner seal. The opening should be small, smaller than most people think. An opening the size of a pinhead is often enough for a narrow joint. A wider opening produces a fat, blobby bead that is hard to tool and harder to keep clean. The tube goes into a standard caulking gun. Squeeze gently and move steadily along the joint, letting the nozzle guide the flow. The goal is a continuous bead about the width of the joint, slightly proud of the surface, not buried deep in the gap.
The Tooling Step That Fixes Everything
Raw caulk straight from the tube looks terrible. It has high spots, low spots, and a rough texture. Tooling is the process of pressing the bead into the joint and smoothing it flat, and it is the step that makes the final line look factory-installed. A wet finger is the traditional tool, and it works fine, but it has a downside. It smears caulk onto the adjacent surfaces and leaves a slightly concave finish that collects water. A better tool is a plastic caulk finishing tool, often sold in the same aisle as the caulk tubes. It has a curved profile that presses the bead into a smooth, slightly convex shape that sheds water.
Regardless of the tool, the technique is the same. Dip the tool or finger in water with a drop of dish soap in it. Run it along the bead in one continuous, firm stroke. Do not go back and forth. One pass, from one end to the other, then wipe the tool clean and do the next section. The soapy water keeps the caulk from sticking to the tool and dragging. Pull the tape off immediately after tooling, while the caulk is still wet. Waiting for it to dry is a classic mistake that results in torn edges and a ragged line. The tape angle matters too. Pull it away from the bead, not toward it, so the edge stays crisp.
Corners are the hardest part, and they deserve a separate pass. A continuous bead around an inside corner almost always collects too much caulk, creating a thick blob that never dries properly in the center. The better approach is to leave a small gap at the corner, then apply a separate, small dab of caulk and tool it with a corner tool or a wet finger to form a clean fillet. This takes an extra minute but prevents the most common spot where kitchen caulk fails and grows mold.
Drying Time and the Mistake of Touching It Too Soon
Silicone caulk skins over in about fifteen minutes, but full cure takes twenty-four hours or more. The skin is deceptive. It looks dry, and a person can press on it and feel a solid surface, but underneath it is still fluid. Anything that touches the bead during those first hours can dent it permanently. The kitchen is a high-traffic area, so the temptation to use the sink or set a dish on the counter is strong. Protect the fresh bead with a piece of cardboard taped along the edge, and warn anyone in the house to avoid the area. A single pan set down on a curing bead leaves a permanent crescent-shaped dent that collects water and dirt forever.
A related problem is shrinkage. Silicone does not dry by evaporation like latex caulk. It cures by reaction with moisture in the air, and it shrinks slightly as it cures. A bead that looks perfectly full right after tooling will pull back a little over the next day. This is normal, and it is why the first pass should be slightly proud of the surface. If the bead sinks below the surface after curing, the fix is a second, thinner pass over the top rather than trying to pile on more material at the start.
Smoothing the End of the Bead
The start and end of a caulk line are where sloppiness shows. At the end of a run, the caulk gun keeps dripping for a second after the trigger is released, leaving a little tail. Do not wipe it with a rag. That smears the line. Instead, stop squeezing a few centimeters before the end point and lift the nozzle away. The remaining gap can be filled with a small dab applied and tooled separately. The tail that does form can be cut off after it dries with a sharp knife, leaving a clean square end. This is a small detail, but it is the kind of detail that separates a professional finish from a DIY one.
Another common error is trying to caulk the entire backsplash perimeter in one continuous line. The joint between countertop and tile is often interrupted by outlets, seams, and changes in direction. Each interruption is a place where the bead will thicken or break. The better method is to work in short sections, about 30 to 60 centimeters at a time, completing the tape, caulk, and tooling for each section before moving on. This keeps the caulk wet and workable and prevents the edges from skimming over before the tape is pulled.
Why the Tape Should Not Come Off Early
There is a persistent piece of advice that says pull the tape while the caulk is wet, and there is a reason it persists. It is correct. But some people interpret this as "pull the tape immediately after squeezing," before tooling. That is wrong. The tape must stay on through the tooling pass because the tooling presses the bead flat and pushes it into the joint. Without the tape, that pressing motion smears caulk onto the tile and the countertop. The tape contains the smear. Pull it only after the entire section is tooled, and pull it at a sharp angle away from the bead.
The same logic applies to the tape width. If the tape is placed flush against the joint, there is no room for the tool to press the caulk without hitting the tape edge. Leave a gap between the tape strips, roughly the width of the joint itself. This gap is the channel where the caulk lives. The tool rides on the tape edges, which act as rails, and the resulting bead has a uniform height across its entire length. This is the closest a homeowner can get to a factory-applied seal.
The Repair Job Nobody Plans For
Even with perfect application, caulk does not last forever. Kitchen silicone typically needs replacement every two to five years, depending on how much heat, steam, and scrubbing it endures. The failure mode is usually at the edges, where the bond to the tile or countertop breaks down. A gap opens, water gets in, and the caulk starts to peel. The moment to replace it is as soon as that gap appears, not when the mold shows up. Mold in a caulk line means water has been sitting in the gap for weeks, and the material underneath may already be compromised.
Removing old caulk is the same process as the initial prep, but it requires more patience. Silicone does not dissolve in most solvents, so the removal is mechanical. A sharp razor scraper angled flat against the surface works, but it risks scratching the tile glaze. A plastic scraper is slower but safer. For stubborn sections, a caulk softening gel can help, but it takes time to work and needs to be rinsed thoroughly before the new caulk goes in. The important thing is to remove every trace of the old bead. New silicone will not bond to old silicone, and a patch job over a partial removal is a guaranteed leak.
One final detail that rarely appears in tutorials: the temperature of the room matters. Silicone caulk flows better when it is warm. A cold tube straight from the garage comes out stiff and hard to tool, with a tendency to pull away from the joint. Leaving the tube in a warm room for a few hours before starting, or setting it in a bowl of warm water for ten minutes, makes the extrusion noticeably smoother. This is the kind of trick that does not show up in the instructions on the tube but makes the difference between a frustrating hour and a clean twenty-minute job.
The finished line of caulk, done properly, is a quiet thing. It sits flush, slightly rounded, and almost invisible against the grout color. It does not collect dust, does not yellow, and does not announce itself. The kitchen looks cleaner because the transition between countertop and tile is sealed, a single uninterrupted surface. That is the actual goal. Not a perfect bead, not a satisfying squeeze, but a kitchen that requires one less thing to scrub and think about. A few meters of caulk, applied with patience and removed with equal care, buys years of that quiet.