
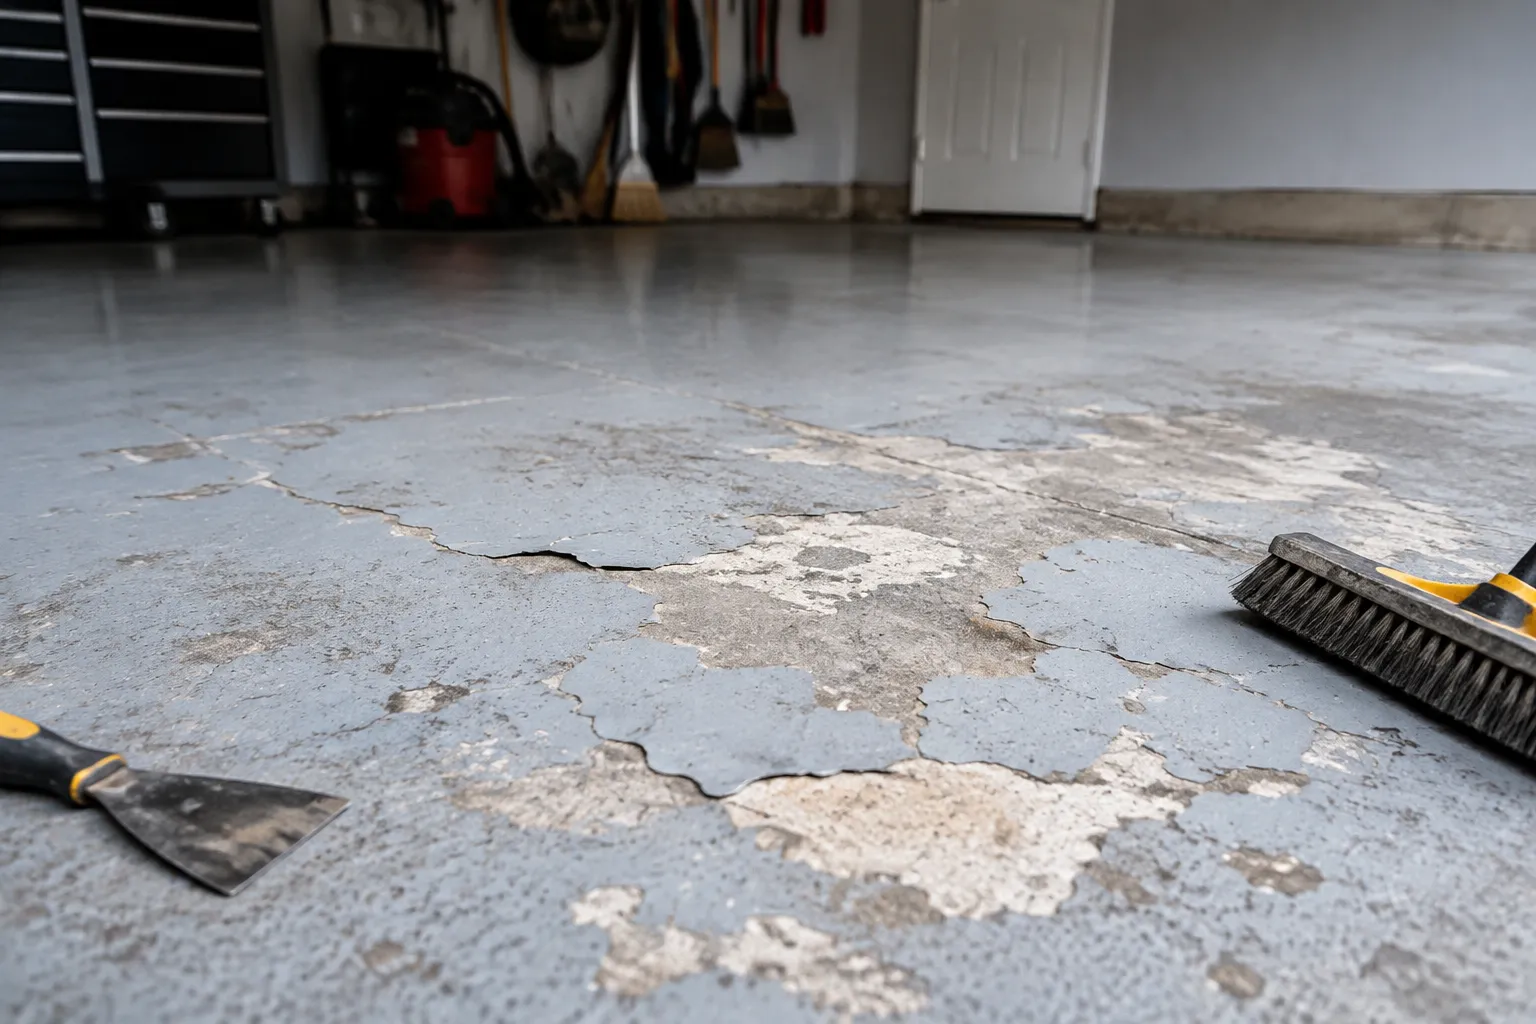
Epoxy garage floors fail in predictable ways. The coating itself rarely causes the problem. The failure almost always traces back to what happened in the hours and days before the first roller touched the concrete. A person can spend serious money on premium two-part epoxy, follow every application instruction to the letter, and still end up with a floor that peels within six months because the slab underneath was never properly prepared. The preparation is the job. The epoxy is just the evidence.
Water is the first enemy, and it is the one people underestimate most. A garage slab looks dry to the eye. It feels dry to the hand. But concrete is porous, and moisture migrates up through the slab from the soil below, especially in climates with seasonal humidity swings. A simple test involves taping a square of plastic sheeting, about two feet by two feet, to the floor and leaving it for a full day. If condensation appears on the underside of the plastic or the concrete darkens beneath it, the slab is releasing moisture. Epoxy applied over that moisture will develop blisters, then bubbles, then bare patches. The fix is not more epoxy. The fix is addressing the moisture source, which sometimes means installing a vapor barrier under a future slab or accepting that this slab is not ready for a non-breathable coating.
The second enemy is efflorescence, the white chalky powder that blooms on the surface of many garage slabs. It looks cosmetic, almost like a light dusting that could be swept away. It is not. Efflorescence is salt and mineral deposits carried up by moisture and left behind as the water evaporates. The powder might wipe off, but the salts remain in the pores of the concrete. Epoxy will bond to that salty layer, hold for a few weeks, and then release like a decal peeling off glass. The common response is to wash the floor with water, which only drives more dissolved salts deeper into the surface. The correct response is a thorough etch or grind that removes the top layer of the concrete entirely, salts included.
The Grind Versus the Etch, and Why the Etch Usually Loses
Two methods dominate concrete surface preparation: mechanical grinding and chemical etching. Grinding uses a walk-behind machine fitted with diamond segments to physically remove a thin layer of the slab. Etching uses an acid solution, usually muriatic acid diluted with water, to dissolve the surface and open the pores. Both can work. Both have devoted camps. But for a garage floor that has seen any real use, grinding is the more reliable choice.
Etching requires precise acid-to-water ratios. Too weak, and the etch does nothing beyond wetting the floor. Too strong, and it damages the surface or leaves a residue that itself interferes with adhesion. The acid reaction also needs to be neutralized afterward with an ammonia and water rinse, and any missed spot becomes a weak point. The process is fussy, and the margin for error is thin. Grinding, by contrast, is mechanical. The machine either removes material or it does not. A person can see the fresh concrete beneath, can feel the roughness with a hand, and can know the surface is ready. That visual and tactile confirmation is worth a great deal on a job where faith is not a strategy.
The cost difference between the two methods has narrowed as diamond grinding equipment has become more common at rental shops. A half-day grinder rental often lands in the same range as the acid, the neutralizer, the safety gear, and the hours of careful application the etch requires. The grind is quicker, less hazardous, and easier to verify. For any slab with oil stains, old paint, or a trowel finish that is smooth to the touch, grinding is the only sensible option. Etch will not remove an existing coating. It will barely touch oil. It simply does not have the teeth.
Skipping the Crack and Chip Repair Before Coating
Small cracks and spalled areas get skipped for a predictable reason: epoxy is thick, and it seems like it should fill them. The coating will fill the depression, and the surface will look smooth. That is true for about a year. Then the crack underneath continues its slow movement, the epoxy flexes beyond its limit, and a new crack appears, this one running through the coating and letting moisture in at the edges. The repair that would have taken an afternoon with a masonry patching compound becomes a full redo.
Relevant cracks need to be opened up, cleaned out, and filled with a product designed for concrete repair, not skimmed over with epoxy. The rule of thumb is simple: if a crack catches a fingernail, it needs attention before any coating goes on. Hairline fissures that are purely cosmetic can often be left alone, because the epoxy will bridge them and the movement is negligible. Anything wider or deeper is a structural issue, and coating over it is just delaying the bill.
The other common omission is the expansion joint. Concrete garage slabs are poured with intentional gaps, usually around the perimeter and sometimes across the middle, to allow for thermal movement. These gaps need to be filled with a flexible sealant, not rigid patching compound, and not epoxy. A rigid fill will crack within a season. A flexible polyurea or polyurethane sealant will flex with the slab and keep the coating intact. People treat expansion joints as an afterthought, but they are the one place where the floor is guaranteed to move, and the prep work has to respect that.
The Dust Test That Reveals a Bad Grind
After grinding, the floor looks like a disaster. A fine layer of concrete dust covers everything, and the surface underneath looks patchy and uneven. That is normal. The mistake comes when a person wipes the dust away, sees what looks like a clean floor, and stops. The dust that remains in the pores of the concrete will prevent the epoxy from wetting the surface properly, leaving pinholes and weak adhesion spots that show up weeks later as tiny craters in the finish.
A rigorous cleanup means a stiff broom to remove the bulk, then a shop vacuum, then a final pass with a damp mop or a tack cloth. The floor needs to pass the white glove test twice. After the first clean, a person should run a hand over the surface. The palm should feel rough, like fine sandpaper. That roughness is the profile the epoxy needs to grip. If the floor feels smooth, the grind was too shallow, and more passes are needed before any cleaning or coating.
One further test costs nothing and takes seconds. Drag a dry finger across the clean surface and look at the fingertip. If any dust transfers, the floor is not clean enough. This sounds overly simple, but it catches more failed installations than any other single check. The dust that a finger can pick up is exactly the dust that will sit between the epoxy and the concrete for the next decade.
Oil Stains That Lurk Under the Surface
Oil stains are the most visible prep failure because they leave a physical imprint even after the epoxy cures. An old oil spot on a garage slab looks like a dark patch that was cleaned on top. The surface may be spotless, but the oil has soaked deep into the concrete. Epoxy will not bond to a petroleum-saturated surface. The coating might hold for a year or two, but the oil continues to migrate, and eventually the epoxy delaminates in that exact spot, curling up at the edges like a dried leaf.
The fix is not degreaser. Degreaser removes surface oil, but it does not pull oil out of the concrete pores. The reliable fix is grinding deep enough to remove the contaminated layer, which is often a quarter-inch or more. On a badly stained slab, a person might need to grind until the concrete looks fresh and lighter in color, and that can mean multiple passes. There is no shortcut. Some products claim to "seal in" oil stains before epoxy, but they create a fresh bond line between the sealer and the epoxy, and that bond line is now the weak point. Grinding is the only permanent solution.
For slabs with heavy, years-old staining that penetrates deeply, a person should consider whether the slab is worth coating at all. Epoxy is a premium finish, and it demands a premium substrate. A floor that has been soaked with oil and transmission fluid for a decade might be better served by a heavy-duty coating product designed for oily concrete, or by an overlay that does not depend on direct adhesion to the stained layer. Sometimes the honest answer is that a slab is not a candidate for epoxy, and forcing the issue just wastes material and labor.
Skipping the Moisture Test, Then Blaming the Epoxy
The moisture test that takes a day is the one prep step people skip because it takes a day. The slab looks fine, the weather has been dry, and there is a holiday weekend to finish the job. So the plastic sheet test gets skipped, the epoxy goes down on a Tuesday, and by Saturday the first blisters appear. The blame lands on the epoxy brand, the roller, the temperature, anything except the slab that was quietly pushing moisture upward the whole time.
Beyond the plastic sheet test, a person can check the season and the local water table. Spring and early summer are the worst times in many regions because the ground is saturated and the slab is cool. A cool slab in a humid garage will also collect condensation on its surface, which is its own problem. The plastic sheet test should be run during the same time of day and the same weather conditions that will exist when the epoxy goes down. Testing in a dry week and then applying during a humid one is testing the wrong thing.
Some garages sit over a high water table or have a history of flooding. For those, the honest move is a moisture vapor emission test, which requires professional equipment and a few days of data collection. It is not cheap, and it is rarely worth it for a single garage. But it is worth asking the question: has this garage ever had standing water, damp corners, or a musty smell? If yes, the slab may not be dry enough for epoxy, and no amount of prep will change that. Some floors are meant for tiles, and that is not a failure of the homeowner.
Rushing the Cure Time and the Temperature Window
Epoxy has a narrow operating window, and it is not printed in large type on the can. Most two-part epoxies require a surface temperature between 50 and 85 degrees Fahrenheit. Concrete takes longer to warm up and cool down than the air, so a garage that reads 70 degrees in the air might have a slab that is still 50 degrees in early spring. Epoxy applied to a cold slab thickens, does not level out, and cures too slowly, trapping solvents and leaving a soft, gummy finish that never hardens properly.
The cure time between coats is another place where impatience undoes careful work. Most epoxies need a partial cure, tacky but not wet, before the next coat goes on, and a full cure before anything heavy touches the floor. The manufacturer's times are based on ideal conditions, and they stretch in cool weather. A person who reads "rec coat within 24 hours" and applies the top coat at hour 22 on a cold slab is rolling the dice. The floor might look fine for months, then the top coat starts peeling in sheets because it never properly cross-linked with the base layer.
The temperature problem also runs in the other direction. Hot weather speeds up the chemical reaction, so the epoxy sets faster than a person can roll it out, leaving lap marks and roller streaks that are permanent. The working time on a 90-degree day can be half of what it is on a 70-degree day. Experienced installers plan the pour for early morning or late evening in summer, or they choose a weekend with moderate temperatures and let the schedule bend around the weather. The epoxy does not care about the calendar.
The Wrong Patch of Concrete to Start On
How a person starts the pour matters more than how they finish it. The first few square feet set the pace, the technique, and the mood. Starting in a corner is the instinctive move, and it is often the wrong one. Corners are where the roller hits two walls, where the coating builds up thicker, and where any mistake becomes visible from every angle of the garage. A better starting point is the center of the slab, working outward toward the edges, so the last areas to be coated are the areas where a slight overlap or trowel mark is least noticeable.
The even bigger mistake is starting without enough mixed product on hand. Epoxy comes in two parts that must be mixed in precise ratios, and the mixture has a finite working life. If a person mixes one batch, spreads it, then realizes the floor needs three more batches, the seams between batches will be visible and weak. The solution is to stage the batches, mix them in advance at the correct ratio, and have them ready before the first roller dips. The clock starts when the parts combine, not when the roller touches the floor.
And here is a detail that gets people: the roller matters more than the brand of epoxy. A cheap foam roller sheds lint, leaves streaks, and compresses under pressure, dragging the coating unevenly. A high-density roller designed for epoxy distributes the material evenly and leaves a smooth finish. The difference is not subtle. A person who has never rolled epoxy before should practice on a scrap piece of plywood, just to feel how the material flows and how much pressure the roller needs. The first few minutes on the actual floor are not the time to learn the technique.
Dust, Hair, and the Garage Door That Ruins a Finish
Garage floors are coated in garages, and garages are not clean rooms. Dust settles constantly, and a single pass of a dusty broom near the work area can ruin a wet finish. The fix is to clean the garage top to bottom before mixing the epoxy, not just the floor. Shelves, window sills, and the overhead door tracks all hold years of grit that will drift down into a wet coating. The prep work includes moving cars out, wiping down horizontal surfaces, and closing the garage door to minimize drafts.
Even with the door closed, a garage is full of debris. Pet hair floats in the air, clothing fibers shed, and a single hair landing in wet epoxy is impossible to remove without leaving a mark. The trick used by professional installers is to wear clean, lint-free clothing and to avoid walking through the work area in dusty shoes. A person should also wait for the final coat to flash off before walking near it, because the air disturbance from footsteps can push dust onto the surface.
The last detail is the one nobody thinks about until it is too late: the overhead door itself. If the door has old weatherstripping that sheds flakes of rubber, or if the tracks have a film of grease that drips when the door moves, the epoxy is at risk. The door should not be opened or closed during the cure period, and any flaking weatherstripping should be cleaned or replaced before the coating goes down. A single flake of deteriorated rubber landing in the middle of a freshly rolled floor leaves a permanent crater.
The Cure Time That Is Longer Than the Label Says
The label on a can of epoxy says "drive on after 24 hours." The label is optimistic. It assumes ideal conditions: perfect temperature, perfect humidity, a perfectly mixed batch, and a light vehicle. In reality, most garage floors are driven on too soon, and the damage appears months later as a faint tire imprint or a soft spot near the door threshold where the car's weight compressed the not-fully-cured coating.
The conservative approach is to wait three full days before walking on the floor in shoes, and at least seven days before parking a car on it. Many professionals recommend two full weeks before the floor sees heavy point loads like a motorcycle stand or a floor jack. The epoxy might feel hard to the touch after a day, but the cross-linking reaction continues for weeks, and the coating's final strength is not reached until that reaction completes. The extra week of parking the car in the driveway is a small price for a floor that lasts a decade.
And there is the final truth about epoxy prep: it is all anticipation. The grinding, the cleaning, the moisture test, the temperature check, the waiting, all of it is done in the present to protect a future that the person getting their hands dirty will never see happen. They will see the result, which is a floor that looks like glass and holds up to everything a garage throws at it. But the actual failure, or the actual success, was decided days earlier, on a dusty slab, before the first drop of epoxy ever left the can.