
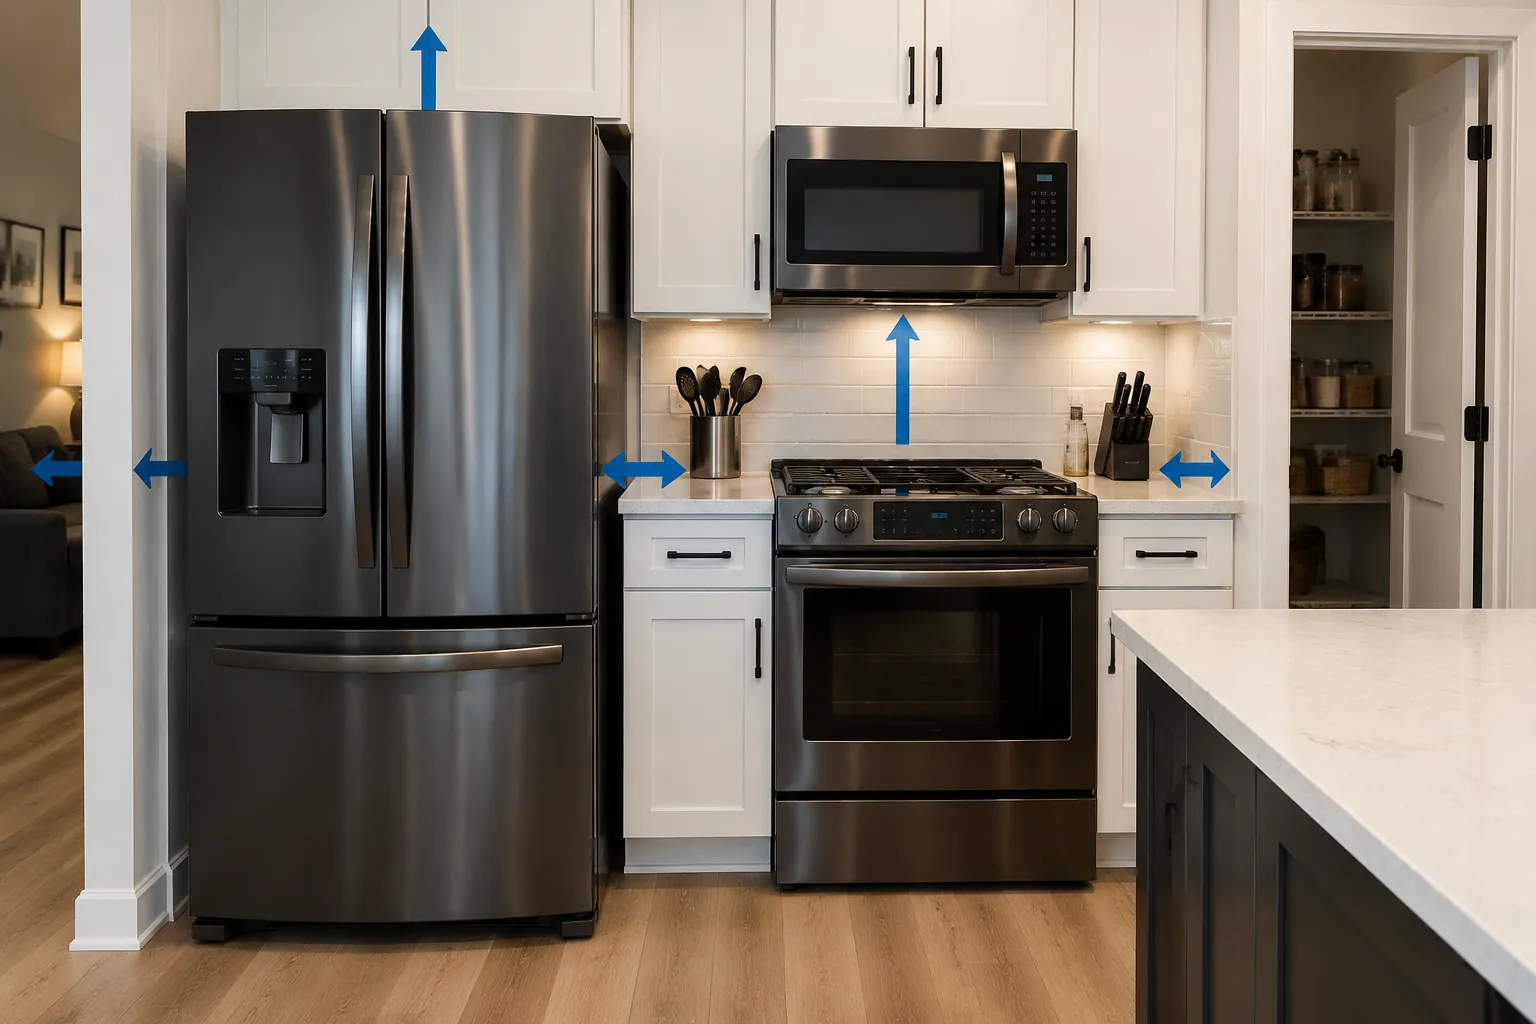
The clearance numbers are the least interesting part of appliance placement, and the most ignored. Every manufacturer prints them in the installation manual: 1 inch behind a built-in refrigerator, 2 inches on the sides, 30 inches between the top of a cooktop and an unprotected surface above it. Installers read those numbers and then proceed to violate them on a routine basis, because the real job is not hitting the number. The real job is keeping the thing from failing in year three, and that takes a different kind of measuring.
There is a gap between what the spec sheet says and what a competent installer actually does. It is a gap filled with drywall thickness, cabinet overhangs, floor settlement, and the simple fact that a refrigerator shakes when the compressor kicks in. The people who install appliances for a living have developed a set of working rules that have almost nothing to do with the pretty diagrams in the manual. Those rules deserve attention, because they are the difference between an appliance that lasts and one that dies quietly behind a cabinet panel.
The Refrigerator Needs Room to Breathe, and to Shake
The condenser coils on a refrigerator sit at the bottom, and the fan pulls air across them. Heat has to go somewhere. The common rule is 1 inch of clearance on the sides and top, but that rule assumes the walls are perfectly flat and the cabinet openings are exactly square. They are not. A cabinet installer who left a 1-inch gap on the drawing can easily produce a 1/2-inch gap in reality, because the drywall has a slight bow or the floor slopes by a quarter inch across the opening.
Working installers add a fudge factor. They want 1.5 to 2 inches of actual, measurable space on the hinge side, because that is the side that flexes when the door opens fully. They want the back clearance to be at least the depth of the coil shroud plus a finger. And they want the top gap to be open, not boxed in by a cabinet soffit that traps heat against the top of the unit.
The shaking part is the one nobody reads about. A compressor starting up creates a torque that makes the whole box rock a few millimeters. If the refrigerator is wedged tight against a cabinet side, that vibration transfers directly into the cabinet frame. Over two years, the screws in the cabinet hinge plates work loose. The cabinet doors start to sag. The installer who left a 2-inch gap on that side never gets the callback. The one who followed the 1-inch spec to the letter does.
There is also the matter of the door swing. A built-in refrigerator door needs to open 90 degrees to slide the drawers out. If the cabinet opening is sized exactly to the fridge with no allowance for the hinge arc, the door hits the side panel at 85 degrees and the drawer stops halfway. This is not a clearance rule in the manual. It is basic geometry, and it gets missed constantly because people measure the box and not the arc.
The Cooktop Clearance Rules That Actually Get Enforced
Cooktop clearance is the one category where the rules are not suggestions, and the enforcer is not the manufacturer. It is the insurance company and the local building inspector. A vent hood over a gas cooktop needs a minimum height above the burner, usually 24 to 30 inches depending on the hood's BTU rating. The number matters less than the reason. A hood set too low is a fire hazard and a head hazard. A hood set too high does not capture the rising plume of grease vapor, which then coats the cabinets above with a sticky film that attracts dust and becomes a cleaning nightmare.
Installers have a working rule for this that goes beyond the code minimum. They aim for the midpoint of the manufacturer's stated range, not the lowest allowed number. A hood at 26 inches over a 36-inch gas range captures the steam and smoke far better than a hood at 24 inches, and it still keeps the cook's head clear. The extra 2 inches costs nothing. It just requires the installer to ignore the temptation to mount the hood as low as the code allows.
The horizontal clearance is where the real arguments happen. A cooktop installed directly against a side cabinet creates a situation where the burner flame licks the cabinet face. The code requires a certain distance between the burner and any vertical combustible surface, usually 2 to 3 inches. But a clever installer knows the flame is not the only problem. The radiant heat from a 15,000 BTU burner will discolor a cabinet finish even if the flame never touches it. The working rule is to leave a minimum 4-inch gap on each side of the cooktop, or install a heat shield on the cabinet face. That gap is ugly, so most homeowners fight it. The installer who insists on it is usually right.
Under the cooktop, the clearance rules get even stricter. A gas cooktop needs a clearance below the burner box, often 1 to 2 inches, to allow the burner flames to draw secondary air. Blocking that gap with a drawer or a panel starves the flame, causes yellow tipping, and produces carbon monoxide. This is not a comfort issue. It is a slow poisoning issue. The installer who checks the drawer height below a drop-in cooktop before signing off is doing more for the household than any vent hood ever will.
Dishwasher Clearance Is About the Door, Not the Box
A dishwasher drawer is a shallow box that slides into a cavity under the counter. The manual says to allow a certain width, usually 24 inches, and a depth that fits the unit. The actual clearance that matters is the swing of the door when it drops open. A dishwasher door needs to fall to a horizontal position so the racks can slide out. If the cabinet above the dishwasher protrudes too far, or if the countertop overhang is too deep, the door hits the trim and stops at a 20-degree angle. The racks then bind on their tracks, and the user starts the age-old dance of pulling the rack while pushing down on the door to force it flat.
The other dishwasher clearance that gets overlooked is the vent. Most dishwashers vent steam out through a vent at the top of the door or through a small port on the side. If the unit is installed tight against a side cabinet, the steam condenses on the cabinet face and drips down onto the floor. Over time, that moisture swells the particleboard cabinet bottom and the wood floor beside it. The working rule is to leave a 1-inch gap on the side where the vent sits, or to route the vent hose to the front. Few people know which side the vent is on when they install. The good installers know, because they look at the tech sheet before they slide the unit in.
There is also the question of the anti-tip bracket. This is not a clearance rule, but it is a placement rule. The bracket screws to the floor and catches the front leg of the dishwasher to prevent a forward tip when the door is opened with a loaded rack. If the dishwasher is shoved too far back, the bracket misses the leg entirely. The installer who leaves the dishwasher 1 inch back from the face of the cabinet has a bracket that actually catches. The one who pushes it flush with the subfloor line has a bracket that does nothing.
The Laundry Pair: The Stacked Dryer Is a Different Animal
Stacked washers and dryers have their own clearance rules, and they are the ones homeowners ignore most often. The dryer vent hose is the primary culprit. An exhaust hose that is crushed against the back wall reduces airflow, which increases drying time, which increases the heat inside the drum, which eventually trips the thermal cutoff and kills the heating element. The clearance behind the dryer needs to be deep enough for the hose to make a smooth bend, not a kink. That means 2 to 3 inches of free space, not the 1 inch a bathroom cabinet gives.
The side clearance on a stacked unit is about vibration, the same as with the refrigerator. A washer on spin cycle generates a lot of lateral force. If the stacked pair sits tight against a wall on one side and open air on the other, the whole assembly rocks. The washing machine's internal suspension can handle the movement if it has room. The drywall cannot. The installer who leaves a 1/2-inch gap on each side is essentially creating a rumble strip. The one who centers the unit with equal gaps on both sides gets a machine that runs almost silently.
The top clearance on a stacked dryer is the one that surprises people. The manual wants 1 to 2 inches above the unit for airflow, but most laundry closets are built tight. The dryer exhausts out the back, not the top, so the top gap is about the dryer's own internal cooling. The motor and the drum bearings generate heat that rises to the top of the cabinet. If the cabinet top is pressed against a shelf, that heat has nowhere to go and the dryer's thermal sensor runs more often, cycling the heating element off and on. Drying times stretch out. The clothes come out damp. The installer who cuts a vent hole in that shelf, or who refuses to install the unit at all until the shelf is raised, is saving the owner a lot of frustration.
The Range and Oven: Why the 30-Inch Rule Matters Less Than the Wall
The 30-inch clearance between the top of a range and any unprotected combustible surface is the most cited number in appliance installation. It is also the most misapplied. The rule exists to protect the cabinet above the range, but it assumes the cabinet is a flat vertical surface. In a real kitchen, that surface often has a microwave under it, a range hood, or a decorative shelf that sticks out 6 inches. The clearance above the range is measured to the bottom of whatever is actually there, not to the ceiling.
Installers have a working rule that accounts for protrusions. If the microwave hangs 6 inches forward from the wall, the clearance is measured from the top of the range to the bottom of the microwave, not to the wall. That distance needs to be 30 inches minimum. A homeowner who measures from the stovetop to the ceiling, sees 36 inches, and calls it safe has made a dangerous error. The installer who measures to the bottom of the microwave and finds only 24 inches has caught a real fire hazard.
The side clearance on a range is about heat, not flame. A freestanding range typically needs 0 to 1 inch of clearance on the sides to combustible surfaces, because the unit has its own insulation. But that insulation only works if the heat can escape. If the range is shoved against a side wall with no gap, the heat radiates into the wall cavity and slowly cooks the framing. The working rule is to leave a 1-inch air gap on each side of a freestanding range, even if the spec sheet says zero. The gap is invisible, since the countertop covers it, and it prevents the slow heat damage that shows up as warped cabinet doors years later.
The oven vent is the quiet killer. Most ovens vent hot air out through a port near the oven door or at the top of the range. That vent releases air at 300 degrees plus. If the cabinet above the range has a drawer that sits directly over that vent, the drawer bottom heats up enough to soften the glue in the drawer joints. The drawer eventually falls apart. The working rule is to keep anything with glue joints at least 4 inches away from the oven vent, or to install a heat shield. Most installers just leave a gap and let the heat dissipate. That is why the drawer over the range is always the one that is slightly warped.
The Clearances Nobody Wants to Talk About: The Back and the Bottom
Front-facing clearances get all the attention because they are visible. The back clearances are the ones that cause failures. A refrigerator needs 1 inch behind it for the condenser fan to draw air. A range needs 0 clearance to the back wall if the wall has a noncombustible backsplash, but it needs 2 inches if the wall is drywall. A dishwasher needs almost no back clearance, because the unit vents out the front. The installer who checks the back wall material before choosing the clearance is doing real work. The one who just slides the unit in and hopes for the best is gambling with the appliance's life.
The bottom clearance is about leveling, not airflow. Every major appliance has adjustable feet, and those feet exist for two reasons: to level the unit and to lift it off the floor for airflow. A refrigerator that sits directly on the floor, with the feet fully retracted, has no airflow under the compressor. The compressor runs hot, the thermal overload trips, and the unit cycles on and off until the compressor seals fail. The working rule is to extend the feet enough to create a 1/2-inch gap under the unit, then level it. That gap also makes it possible to slide a cleaning wand under the fridge to pull out dust and pet hair. Nobody does that cleaning. The airflow still helps.
The leveling itself is a clearance rule. An appliance that is not level will walk across the floor over time. A washing machine that is off by a quarter inch on the front left foot will vibrate and slowly scoot 2 inches across the laundry room floor in a year. A refrigerator that is tilted back slightly will have a compressor that runs more often. The installer who spends 10 minutes with a bubble level and a wrench is not being fussy. They are preventing a service call that will happen 14 months later, after the warranty expires.
When the House Decides the Clearance for You
The most honest thing an installer can do is admit that some clearances are not achievable in the space provided. A 1920s house with a 24-inch-deep counter and a 12-inch-deep soffit above the range will not fit a modern range with a 30-inch clearance to the bottom of that soffit. The installer has two options: walk away or get creative. Walking away is the professional move, but it is also the move that loses the job. Getting creative means installing a heat shield on the bottom of the soffit, which must be a specific material with a specific thickness, and then measuring the clearance to the face of that shield. It is a real solution that requires real knowledge. It is also a liability transfer. If the shield fails, the installer owns the fire.
The other common conflict is the refrigerator alcove. Many kitchens are framed with a 36-inch-wide opening for a refrigerator, which fits the box but leaves zero room for the doors to open. The refrigerator doors need to swing past the face of the cabinet to allow the crisper drawers to pull out. A 36-inch alcove with a 33-inch-wide refrigerator leaves a 1.5-inch gap on each side, which is exactly enough for the hinges to clear. It is also exactly enough for the doors to hit the side panels when opening. The installer who points this out before the countertop is installed is doing the homeowner a favor. The homeowner who insists on the 36-inch opening anyway gets a refrigerator that can only open 110 degrees and a drawer that pulls out halfway.
The clearance rules are not abstractions. They are the physical requirements for air to move, heat to escape, and doors to swing. An appliance that cannot breathe runs hotter. An appliance that runs hotter fails faster. That is the whole argument. Every clearance number in every manual is just a translation of that basic fact into a dimension.
The installers who know this are the ones who measure twice, leave the extra inch, and ignore the homeowner who says it looks too gappy. The gap is not a sign of a sloppy install. It is a sign of an installer who has seen what happens when the gap is gone. The compressor that seizes in July. The dishwasher door that warps from steam. The dryer that takes three cycles to dry a towel. The gap is the cheap insurance. The installer who leaves it is the one who does not get called back. That is the measure of a good install.